Iwatake Isengard
Climbing Routes at Iwatake Isengard
Aspect and Location
The rock is located on the west side of the ridge connecting Aosasayama and Juumaizan, overlooking Abe River, about 25km to the northwest of Shizuoka city centre.
The rock is superbly isolated, situated at the top of a steep sparsely wooded slope. The views to the west can be breathtaking in the right conditions, but unfortunately, so too can the wind, which will strip you of anything you haven't tied down.
The best seasons for climbing here are spring and autumn. I haven't tried summer up there yet, but I can tell you that there's a lot of snow around through winter.
There is some loose rock here and there, but the routes generally stick to the solid stuff. The rock is very rough, giving excellent friction but also taking a painful toll on soft fingers.
Getting There
- From Shizuoka, follow Route 27 (Abe Kaidou) north through Do towards Umegashima.
- Just after Do, take a right fork to Utougi.
- Climb steeply and with many bends through the village, up, up and beyond to park where the asphalt ends and gravel starts. Park here.
- From the parking area, follow a hiking path heading up into the woods. This climbs steeply at first then more gently to Jizoutouge, a pass on the ridge between Aosasayama and Juumaizan. (About 40 minutes.)
- Follow the ridge left and up (towards Juumaizan) for about 50 minutes. The ridge levels off and weaves through some beautiful tree and boulder stylings.
- Shortly after the trees and boulders, a single 3m boulder sits on the left of the path. Follow a faint path just before this diagonally left into the bamboo grass to emerge on the ridge proper, dropping steeply to the valley below. You should be able to see the top of the rock jutting out into space. (If you miss the turn off the main path, you will come to a sign marking the "peak" of Iwatake at 1,600m.)
- To get to the base of the rock, follow a faint path through bamboo grass diagonally right (facing out) then cut back left. Be careful because the bamboo slope can be slippery and the gully near the bottom is not very solid.
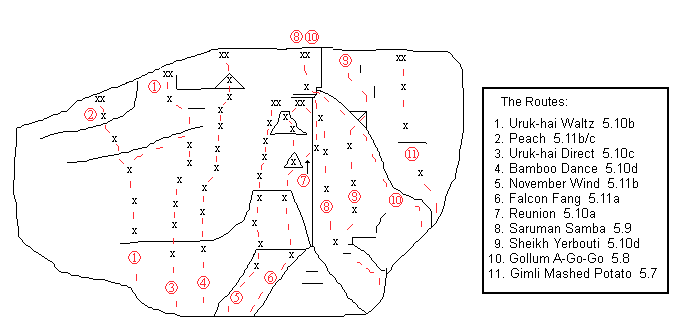
Topo
Route Descriptions
The routes are described from left to right.
Uruk-hai Waltz 20m 5.10b
Climbs the left face of the crag with a detour along the slanting crack. 4 bolts and cams up to Friend #3.
Climb easily to an overlap at 5m. Clip and pull over then follow the bolts slightly left to a horizontal crack. Traverse right (good gear), pull up to a break (more gear), then step left and go up past a bolt to a lower-off.
Peach 13m 5.11b/c
Basically a direct finish to Uruk-hai Waltz. 5 bolts protect, with optional small cams.
Follow Uruk-hai Waltz to the horizontal crack, then continue over the bulge on small holds and on to a lower-off.
Uruk-hai Direct 16m 5.10c
Basically a direct start to Uruk-hai Waltz. 7 bolts protect.
Climb direct to join Uruk-hai Waltz at the end of its traverse.
Bamboo Dance 20m 5.10d
The bolted line just right of Uruk-hai Direct. 9 bolts.
After a gentle introduction, strenuous moves on generally good small holds lead to a capping overhang. A quick burn over this should see you safely at the lower-off.
November Wind 20m 5.11b
Another tight line squeezed in between its neighbours. 8 bolts.
Climb up left of an overhang, using the arete as much as possible at first. Eventually, crux moves lead you away from the arete and better holds lead to a lower-off.
Falcon Fang 20m 5.11a
A good steep climb up the left side of the prominent arete. 5 bolts and a small cam protect.
Start just left of the overhanging base of the crag and climb up to the first of 3 overhangs almost inline. Take the first 2 direct and make a kink left to surmount the third.
Reunion 20m 5.10a
A variation that dodges the beefier parts of Falcon Fang. 5 bolts and small cams.
Follow Falcon Fang to the second overhang, then step right to the arete and follow this to the lower-off.
Saruman Samba 20m 5.9
Climbs the prominent arete on its righthand side. Take Friends #2~4 for the pod.
Start by stepping up to a pod leading left. Follow this (good cams) to pull past a bolt onto an easy slab. Continue more steeply using the arete on the left to a good ledge. Step left and go up to a lower-off.
Sheikh Yerbouti 22m 5.10d
Climbs the slab right of Saruman Samba then pulls out right through the diagonal overhang. Take Friends #0~4.
Climb the pod as for Saruman Samba, then move right and climb the centre of the slab past 3 bolts to the overhang (junction with Gollum A-Go-Go). Step up to a notch and pull wildly right with flapping feet (good small cams in the notch) onto the slab on the right. Continue easily to the top.
Gollum A-Go-Go 14m 5.8
Follows the line of the big diagonal fault to join Saruman Samba at its last bolt. Take a rack.
Start at the base of the fault. You can scramble to this point, but it's much easier to ab down Gimli Mashed Potato.
Follow the line of the fault all the way to the arete. There's some dirty and loose rock, but enough good rock and gear to make it pleasant. Finish up Saruman Samba (crux).
Gimli Mashed Potato 12m 5.7
Climbs the short slab just before the rock disappears back into the hillside.
Start as for Gollum A-Go-Go, but step up onto the slab on the right and climb pleasantly past 3 bolts to a lower-off.
First Ascent Details
The rock's potential as a climbing venue was first identified by local hobbit Gen Satou, who managed to rope in his brother and members of Shizuoka Kinrousha Sangakkai for development. When their initial enthusiasm was battered into submission by the epic winds, Toshiyuki Kobayashi stepped in to bag the remaining lines.
|
Date |
Route |
Climber |
|
March 17th, 2013 |
Saruman Samba |
Neil Harrison |
|
March 17th, 2013 |
Uruk-hai Waltz |
Gen Satou |
|
April 14th, 2013 |
Gimli Mashed Potato |
Shu Satou, Neil Harrison |
|
April 14th, 2013 |
Gollum A-Go-Go |
Neil Harrison, Shu Satou |
|
April 14th, 2013 |
Sheikh Yerbouti |
Neil Harrison, Shu Satou |
|
2013 ~ 2015 |
All other routes |
Toshiyuki Kobayashi |