
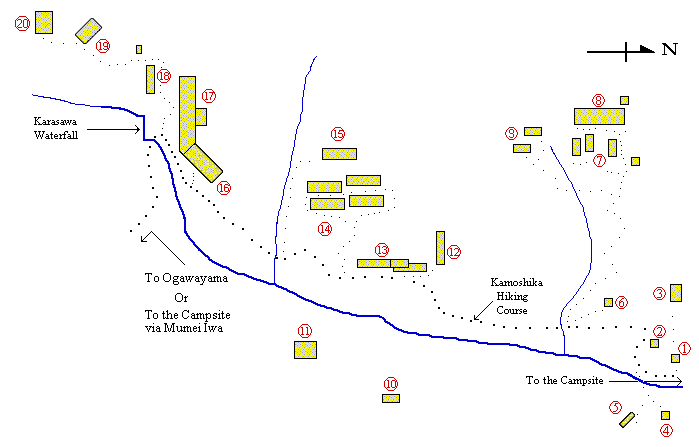
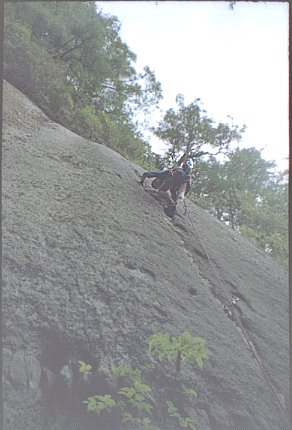
This section deals with the crags passed along or accessed from the Kamoshika Hiking Course leading from the top campsite to Karasawa Waterfall. These are hard to work out from the campsite. The most prominent is Toride Iwa, the steep, east-facing curtain of rock set high on the slope.
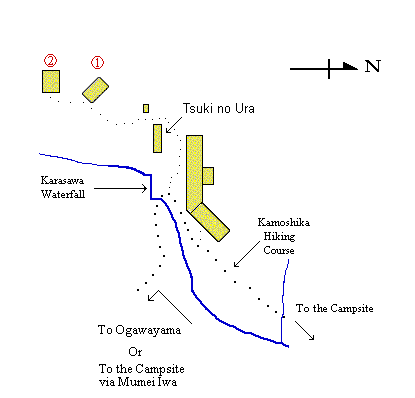
The waterfall is worth seeing in its own right, especially after rain. It should take about 35 minutes to get there. Rather than going back the way you came, you can turn the hike into a neat 90-minute circuit by following the path across the stream and climbing to join Shin Ogawayama Hiking Course on the ridge above Sagan Slab. From here, turn left (right takes you to Ogawayama peak) and follow the path along the ridge, up and down some short ladders, before dropping down and passing by Tiny Slab and Modoki Iwa, among others, on the way down to the campsite.
|
|
Ojisan Iwa - Uncle Rock
This is the crag on the right of the path to the waterfall, visible just after you cross back over the (almost always) dry stream about 250m up from the Panorama Course junction. The crag remains green and murky despite the felling of many trees in the area.
The word "iwatake" in a couple of the route names refers to the green and black leafy lichen that is found on sheltered lumps of rock such as this. It appears to be called "rock tripe" in English. If you start feeling peckish, there are some recipes for it online!
| Hyper Kante - Hyper Arete | 5.12a | 12m |
| A rather pointless route up the right arete. | ||
| Start just right of Iwatake Ojisan. Pull up to the arete and follow it on its right side up the gully to a lower-off. | ||
| Iwatake Jiisan - Grandpa Fungus | 5.10c** | 14m |
| Pleasant climbing up the central line on the front of the buttress. The second clip is quite bold. | ||
| Start at the toe of the slab and follow the front rib to a drop in angle. Step up and clip, then smear left and up with difficulty to a ledge. Finish between vegetated cracks at a tree and lower-off. | ||
| Iwatake Ojisan - Uncle Fungus | 5.10a* | 13m |
| Not-so-pleasant deviations give a much easier route that requires a steady lead. Friends 2-3 also help. | ||
| Start up the slope to the left. Climb diagonally right to join Iwatake Jiisan at its second bolt. Go up and right to a flake, then back left into Iwatake Jiisan to finish. | ||
| Midori Hime - Green Princess | 5.10a** | 12m |
| The left arete of the slab is much more pleasant than it looks. | ||
| Start as for Iwatake Ojisan. Climb the blunt arete direct via some fun moves. Step right to join Iwatake Jiisan at the top. | ||
| Kinoko Hime - Mushroom Princess | 5.8 | 10m |
| A waste of our time up the lush slab left of Midori Hime. This must be what it is like to climb a stack of disintegrating snooker tables. | ||
| Pull out of the gully to a jug, stretch left to clip then scrabble for holds to a ledge as for Iwatake Ojisan. If you can reach the top slab (left of the crack) climb this, otherwise, step right to join Iwatake Jiisan at the top. | ||
Cliché Crag
I gave the crag a name because it didn't have one. In the latest (2009) Japanese guide, this is called Noren Iwa, with the words 'provisionary name' in brackets. A short way along the path to the waterfall from Ojisan Iwa, break off right up the slope just left of Ojisan Iwa. About 50m up here on the left a house-sized (where I come from) crag is visible on the left. This is Cliché Crag.
| Oni ni Kanabou - Safe as Houses | 5.10c | 15m |
| The bulging, juggy lefthand line. Atrocious rock. | ||
| Start on the right. Climb the short lower wall to swing left below the bulging section. This is easier than it looks, but still "exciting". Continue to a badly placed lower-off. | ||
| Neko ni Koban - Pearls Before Swine | 5.10a* | 15m |
| The steep righthand face. Literally, "Cash before Cats". | ||
| Climb the attractive but short face on good holds to a lower-off. The rock is good, but the proximity of loose stuff keeps you on your toes. | ||
Kabuto Iwa - Helmet Rock
Approach by skirting Ojisan Iwa on its left. A vague path can still just be made out. Follow this up the deteriorating slope for 150m. Kabuto Iwa is the only decent crag on this slope, so you shouldn't miss it. Well...
You can also cut up and across on a no-path from Cliché Crag. Last time I looked (August 2010), there were bolts but no tat for the lower-offs. All the rock and route names have a connection with the boys' festival (in May).
| Koi Nobori - Carp Streamers | 5.11c* | 18m |
| The bulging line up the steep left face. Take a rack | ||
| Start at the right edge of the big overhang on the left face (well up the gully on the left). Climb through bulges on crumbly holds to a good flake. Continue on jugs to a slab and on to a lower-off. 10c if you use some holds that you're not supposed to use. | ||
| Unreported | 5.9 | 8m |
| A waste of good bolts up the short rib on the narrow front face. | ||
| Start by swinging up to a good pedestal at the foot of the rib. Climb the narrowing slab easily to twin bolts (no tat). I think you're not supposed to touch the cracks on either side. | ||
| Yoroi - Armour | 5.10c | 11m |
| A top-rope problem. | ||
| Climb the short capped corner at the left end of the right face then pull onto the rib on the left and continue to the twin bolts on the previous route. It is easier and more pleasant to start up the face just right. | ||
| Sekku - Annual Festival | 5.9** | 10m |
| The right face. Worthwhile. | ||
| Start a few metres up the slope from Yoroi. Climb the black slab pleasantly past the pretty-coloured bolts to the twin bolts (no tat). | ||
| Satsuki - May | 5.10d* | 16m |
| The bolted face and slab up and right. The hard moves can easily be avoided on the left and, combined with a clean-up, that would make a pleasant 10a. | ||
| Start on a ledge left of a jungle in a corner. Make a hard pull up past an obvious white pocket to better holds that include a weird and wonderful little knob. From here, climb the slab easily to a lower-off at the top (bolts but no tat). | ||
| Tsutsuji - Azalea | 5.7 | 15m |
| A top-rope problem right of Satsuki. You could probably protect it if you could find the crack! | ||
| Start at a short, dirty corner just right of Satsuki. Climb the dirty corner to a dirty slab. Follow this dirtily to the top. Dirty. | ||
Lost World
An atmospheric slab hidden away in the woods right of Hotoke Iwa. Rarely sought and almost never found. Blowtorch and/or sandblaster obligatory for routes other than Zuino.
Follow the path to the waterfall. About 200m past the boulder and turning for the Panorama course you come to a sign that says 500m to the waterfall. This is just after a wide stream (if there's any water) and opposite Ojisan Iwa. A smaller path cuts back left at the sign. Follow this back across the main stream to a small stream coming down a steep-sided valley on the right. The steep wall high on the left contains Rolling Stone. Follow the stream itself (there was still some red and yellow tape and a few small cairns in 2001) for about 200m to the toe of a mossy slab. The Lost World slab is round to the left of this.
| Zuino | 5.11b***** | 20m |
| My favourite route at Og. Superb technical climbing up the disappearing dike on the right of the crag. The best of the dike trio (Noizu, Zuino, Noizuino) and well worth seeking out. | ||
| Pleasant climbing past spaced bolts up the dike leads to a point where the dike becomes a single quartz knob. Make a devilish move to stand on the knob and, just when you think it's all over, it isn't. The crux slippery semi-mantel followed by a dodgy smear brings the lower-off within reach. | ||
| Funny Face | 5.11b | 20m |
| Somewhere under the lichen to the left is a line of bolts. | ||
| Climb and regret. | ||
| Tajan III -Tarzan III | 5.10b | 20m |
| The next weakness along. | ||
| Climb and regret. | ||
| Groovy Groove | 5.11b | 20m |
| The groove finishing at a dike. | ||
| Climb and regret. | ||
The next route is usually found by lost souls looking for Lost World. From the path that cuts back, cross the small stream coming down the steep-sided valley on the right and head for the steep walls straight ahead. Towards the left end of these is an obvious, steep, thin crack. Some new bolt lines were added in 2007, details to come. Said he, several years ago. The crack is:
| Rolling Stone | 5.12c*** | 15m |
| Worth another star if clean. The gear is good, but hard to place. | ||
| Climb the crack all the way to a lower-off under a small roof. Painful and strenuous however much technique you put into it. | ||
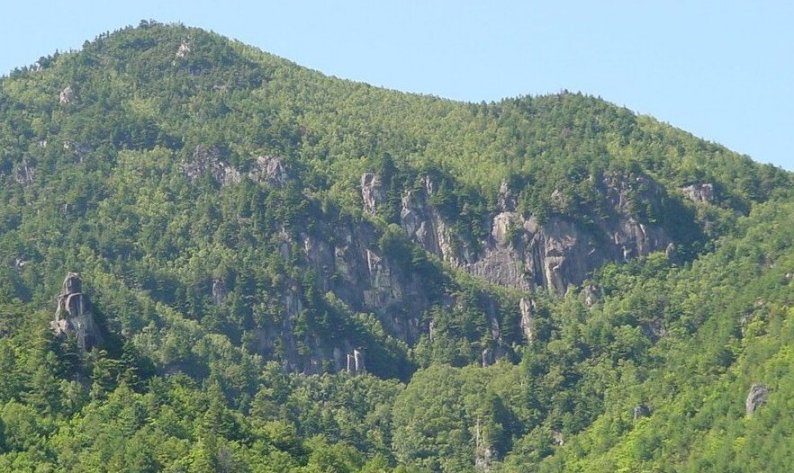
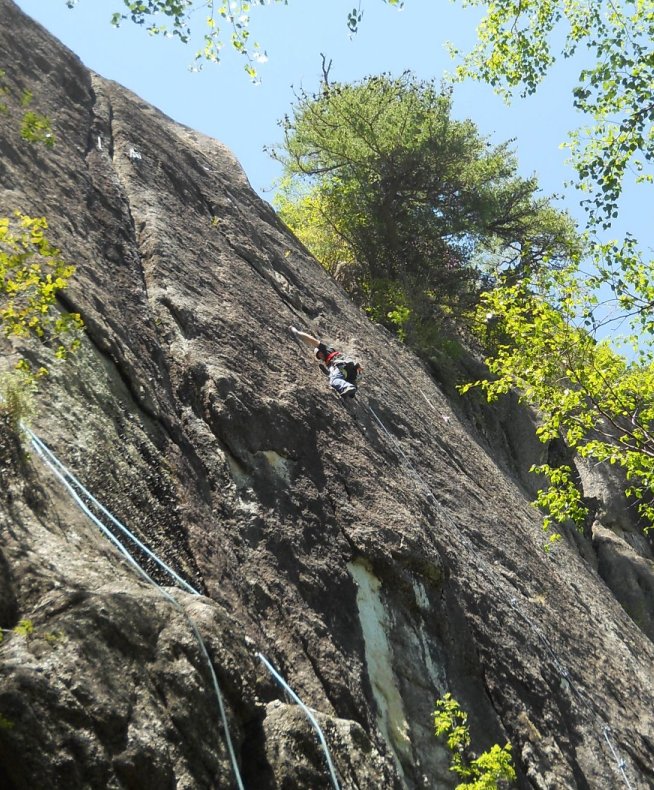
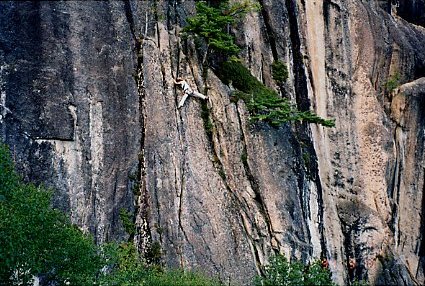
Toride Iwa - The Fortress
The big wall set back in the valley and high on the hillside provides some excellent steep slabs, faces and cracks. Some of the routes are rarely climbed and can be quite dirty. 2001/2002 saw a lot of development in this area across to the left of Shinrin Escalator. And some of the routes are very good. Others, not so. And some haven't been reported.
Follow the Kamoshika Hiking Course towards the waterfall. About 5 minutes after Ojisan Iwa, where the main path fords a stream, follow a smaller path upstream on the right of the stream, eventually breaking off uphill. There is (2017) a big red cross tacked to a tree on this path to discourage unsuspecting hikers. The path winds up past some boulders into a hollow. The face on the right has an attractive bolted line (Shirakaba) right of a flake (Ocean Blue). Follow a fainter path left to the chimney at the start of Arch Crack and on to the new areas, or follow the continuation path more steeply to the main crag.
It should take about 20 minutes to get to Shirakaba and a further 5~10 minutes to get to the other areas from there.
The photo below shows the Toride rocks seen face on. Roll your mouse over it to see crag names. Click a name to jump to the crag description.
|
|
Toride Sawa Migi Mata - Toride Stream Right Branch
This slab is almost visible from the stream on the main path. It currently has just the one route.
From where the path splits and the main path crosses the stream, head right up a (usually) dry wide stream bed for 100m to the first substantial slab on the left.
| Houtou Musuko no Kikan - Return of the Prodigal Son | 5.10c* | 18m |
| The centre of the scruffy slab is dirty and quite bold. Take a couple of medium Friends for the crack. The newer bolted lines either side are unreported. | ||
| Start behind a huge fallen tree and make a couple of insecure steps up to the first bolt. Reach up to a painful quartz hold and clip again, then make hard moves to some short cracks with a tree stump (cam). Pull neatly up to the more relaxed top slab and burrow hillwards to find a sturdy tree to ab off. You're not exactly spoilt for choice. | ||
Toride Iwa - Lower Crags
A couple of long slender crags sit under Toride Iwa. These have been construed as supporting legs of the main crag. There are other smaller crags dotted around the woods in this area. The first of interest is just below and right of where the path splits.
| Ocean Blue | 5.10a* | 15m |
| The steep flake on the left of the crag. Take a rack. I haven't done this, but I'm told the top is very run out. | ||
| Gain the flake and follow it to its end. Continue up then move right to finish. | ||
| Shirakaba - Silver Birch | 5.11b** | 15m |
| A good steep face climb right of Ocean Blue. | ||
| Start a couple of metres right of Ocean Blue and follow the bolt line direct to finish up it. | ||
Higashi Mon, Migi no Monbashira - East Gate, Right Pillar
An impressive crackline gives the only route. To get a better idea of where you'll be going, it's best to walk across to Ogawayama Shantse then look back. The line is obvious.
| Arch Crack | 5.10a*** | 65m |
|
The big crackline slanting to the left eats Friends. A couple of monsters are handy, but not essential. Note that, as described below, apart from the top of Pitch 1, you are always belaying on gear. The route is shown as 3 pitches in the topos, but rope drag and common sense suggest 4 is a better option. | ||
|
Pitch 1. 5.8 (12m) Climb up some tree roots to a recessed chimney. Follow this past a couple of chockstones to a desperate thrutch onto a ledge. If you don't fancy the thrutch, you can swing out left on a good hold before things get nasty. Belay on good trees below a large flake. Pitch 2. 5.9 (15m) Climb the flake (hard to start, but it soon eases) to a conundrum. You want to be in the left-facing corner up and left. Either scratch up the dirty face to the hang and make a thin pull round into the corner, or step down and left (off the flake) to a good tree and use this to pull back right into the corner. The corner gives excellent jamming and laybacking to a niche below a short wide crack. Some topos mark the top of the first pitch as a tree at the top of the flake. Either the tree pulled or they mean the tree out left of the flake (which doesn't look like it's been used for belaying). Pitch 3. 5.10a (13m) Squeeze up to the off-width and make a couple of hard pulls to sinking jams in a crack leading left. Traverse the crack out left to a bigger recess and belay. A superb pitch! Pitch 4. 5.9 (20m) Chimney up to the roof, then follow a good crack out left underneath it. Where the roof peters out, either pull right into a short off-width and thrutch to the summit or continue left and climb an easy short crack. To descend, drop down over the back of the rock (in front of Toride Iwa) and then walk down. To drop down from the top of the rock, it is possible to climb down the shortest side, but better and safer to rig up an ab (in which case, be prepared to leave some tat). | ||
Higashi Mon, Hidari no Monbashira - East Gate, Left Pillar
From the hollow, follow a path left past a cleft. Continue up and round to the obvious twin slabs of Ogawayama Shantse and Shinrin Escalator. The routes are described from left to right.
| Kaichuu Elevator - Underwater Elevator | 5.8** | 20m |
| Good fun in the chimney up and left of the smaller lefthand slab. Take gear. | ||
| Burrow up the chimney past a convenient tree to a bolt. Thrutch past this to enter a tunnel on the right, then funnel up and right to the ridge between the two slabs. If you funnel down, you'll fall down Morocco Crack. Climb pitch 2 of Ogawayama Shantse to round things off nicely. I'll even give you an extra star. | ||
| Shinrin Escalator - Forest Escalator | 5.10c*** | 35m |
| The centre of the lefthand slab. Excellent. | ||
|
A choice of starts (right is easier and original) leads to a dike. Easier climbing gains a small ledge, from which an insecure mantel gets you stood on a vague dike. Continue by lovely sustained slabbing to a good tree on a ledge. A 60m rope will just get you down on the stretch. | ||
| Morocco Crack | 5.10a** | 16m |
| The crack in the right side of the smaller lefthand slab has a bizarre finish. Take lots of bigs. According to the tag, it's not called Morocco Crack anymore, but I can't remember the new name. | ||
| The crack starts off jammable, but keeps getting wider. Dive into the slot at the top and finish up the tunnel of Kaichuu Elevator. | ||
| Ogawayama Shantse - Ogawayama Ski Jump | 5.11c**** | 60m |
| The centre of the righthand slab. The Devil's Slide of Ogawayama (bit harder, though). Superb. Take a set of cams for the top pitch. Ignore the meandering line-drawing in the Kitayama topo - it's a pretty much direct line. | ||
|
Pitch 1. 5.11c (25m) Thin slabbing up the mossy left edge of the slab leads to a bulge. Three consecutive hard moves get you stood up on the slabbier upper section, from where a spicy little runout leads to a steeper finishing slab. Climb the left edge of this to a bolt belay on a good ledge. A very sustained pitch! Pitch 2. 5.9 (35m) Start up the wide crack in the corner, but step left as soon as possible onto the slab and climb this to a crack. A stiff pull gains the tree (be gentle) and an easier but crumblier continuation leads to the top. A short climb down over the back lands you in the bay below Toride Iwa. Alternatively, you can ab the route, but if you're using a single 60m rope, you'll be a couple of metres short of the chain at the top of Pitch 1 even on the stretch. | ||
| Sekisho Yaburi - Breaking Barriers | 5.12a* | 15m |
| The crack in the right side of the righthand slab. An excellent line, but it will need a clean-up. | ||
| Climb the crack to a lower-off. "5.11d if you use the chockstone." But an ascent without chockstones is an ascent without dignity. Or was that kettles? | ||
Toride Iwa - New Areas
Charlie Chainsaw and the Demons of Hilti have wreaked serial havoc on two tiers of rock across to the left of Ogawayama Shantse. Access by following the path across from Arch Crack, past Ogawayama Shantse. The path leads quickly into a usually dry stream - continue left to the Lower Tier, or scramble up the stream and left to the Upper Tier.
Upper Tier details have not been released yet, perhaps due to shame at the amount of damage caused, but more likely because there is more to come.
The New Area - Lower Tier
Routes are described from Right to left. Some of these are already in the latest guide.
| Tsukamitakunaru - I Want to Grab it | 5.10c** | 9m |
| The face above an easy slab at the right end of the rocks. I think 'it' is the small tree right of the lower-off. Personally I have nothing against trees on or near routes, unlike the people who developed this area. | ||
| Climb easily to the face. Pull up the flake and mantel steeply. Mantel more delicately to just below the top. Pull on the tree on the right or make a delicate step up to the lower-off. | ||
| Bitta | 5.12c* | 7m |
| The next face left, gained by pulling up a short fixed rope. | ||
| Climb the short face - a lot harder than it looks. | ||
| Buyuuden - Tale of Valour | 5.13a*** | 18m |
| The big looping line on the sidewall to the left of Bitta. | ||
| Start as for Bitta, but pull onto the face on the left. Go up to a thin overlap and follow this left. Pull up, then go right and up to a lower-off. | ||
| Bintaman - Slaphead | 5.13a*** | 17m |
| The stupendous line through the left side of the big hang. | ||
| Start in the centre of the face. Move up and pull out left, almost into Kanzen Naru Shuuran. Pull through the roof using a prominent hole and a good hold on the lip on the left. Continue more easily to a lower-off and in situ bunch of bananas. | ||
| Kanzen Naru Shuuran - Pissed as a Newt | 5.10c** | 18m |
| The hideous yet somehow attractive cleft just left might remind me of Elder Crack if I ever do either. The name refers to the best state to be in when climbing the route. | ||
| Climb direct to the wide crack from the thinner crack below it or the bolted slab on the right. It doesn't really matter which you choose - you're not in pain yet. There are bolts here and there (but only the RCC bolt on the left actually belongs to this route), otherwise protection depends on how many monster cams you can afford. | ||
| Shuugyouzou - Ascetic Monk | 5.12c** | 22m |
| The steep slender face just left of Kanzen Naru Shuuran. | ||
| Start in the undercut centre of the face. Pull up on dodgy rock to a rest above the undercut. Step right to a shallow groove, climb it, and finish in the centre of the face. 12a if you dip into Kanzen Naru Shuuran for holds. | ||
| Icchoura - Best Bib and Tucker | 5.12c**** | 22m |
| Good varied climbing on a cracking line. Take Friends 2-3. | ||
| Start next to Shuugyouzou. Pull steeply up the lower arete before a technical sequence gets you in position to swing left to a hanging flake. Sprint up this to easy ground and a lower-off. | ||
| Tokage no You ni - Like a Lizard | 5.11b** | 25m |
| The long slim slab left again. Take Friends 1-3. | ||
| Start on a small terrace below an overlap. Pull into the scoop below the overlap using a crucial one-digit pocket (crux) and balance up to a cam placement. Clip the second bolt then pull over to its right and make another hard move to a ledge and crack (cams). Continue up the slab past a final tricky smear to a lower-off. | ||
| Hanami Mushi - Hanami Bug | 5.10c* | 15m |
| Hanami is the word for watching the cherry blossoms. They don't do much. Take a rack. | ||
| Climb the first prominent slanting wide crack in the cruddier face left of Tokage no You ni to a lower-off in a tree. Painful and insecure. | ||
| Banzai Jam | 5.10c** | 17m |
| The less cleft-like crack left again. Take a rack. | ||
| Climb the crack to a lower-off in the face. Marginally more fun that its neighbour - but that doesn't mean it's fun. | ||
| Noboru Saitama-ken Jin - The Climber from Saitama | 5.12b*** | 22m |
| Good climbing up the big arete a few metres left of Banzai Jam. Take a couple of big Friends (4ish). | ||
| Start right of the arete and climb left, right and both of it to where the angle eases. Finish at a lower-off in the slab. | ||
| Matsutake Fuumi - Matsutake Flavour | 5.11c* | 18m |
| The slim face left of an ugly wide crack. | ||
| Climb the centre of the scruffy face. Sustained low down and in need of a proper brush-up. | ||
| Unnamed | 5.10a* | 12m |
| The grotty face left of another unclimbed cleft. | ||
| Climb the face, starting well to the right and moving left of the boltline at the second bolt. Nice enough moves once you get going, but dreadful rock. | ||
| Kaminari Tarou - Johnny Thunder | 5.11a** | 40m |
| The long face starting a few metres left of Unnamed. A third pitch is under construction. | ||
|
Pitch 1. 5.11a Start right of a big bulge. After a steep start, easier moves lead up and right to a short corner. Climb this then go diagonally left across a stiff slab to the left edge of an overhang. Pull over and climb easily to a bolt belay. Pitch 2. 5.10d Climb the pretty much direct continuation boltline. Ab off. | ||
| Nanden Kanden - Whatever | 5.11a* | 12m |
| The grotty, shrouded face 20m left. Needs more cleaning. | ||
| Climb the face, with hard moves at its steepest point, to easier dirty climbing to a lower-off. | ||
The New Area - Upper Tier
From the approach to Tsukamitakunaru, continue straight up the stream, mainly on the right and using fixed ropes here and there. Below the first substantial face, cross the stream and go up into a clearing containing the evidence of serial chainsaw crime. None of the routes have been reported.
Toride Iwa - Upper Crags
The big wall rising from the hillside contains a lot of unjustifiably neglected routes.
Follow the path right of the start to Arch Crack steeply up to a cramped bay below a towering wall. And mind your head on that rock fang. Routes are described from wayyyy over left to right, but to give you some bearings, the fang of rock is between the starts of Mitsurin no Madonna and Western Lariat.
Toride Iwa - Left End
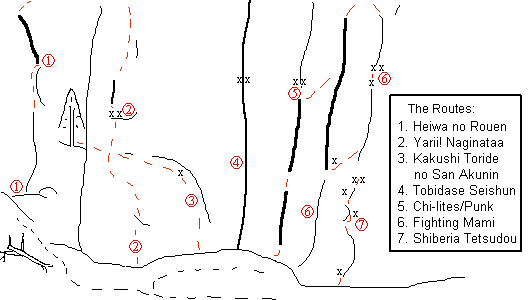 |
| Heiwa no Rouen - Rocket of Peace | 5.10c* | 45m |
| The hand/offwidth crack at the extreme left of the crag. Challenging, shall we say? Take a bucketful of Friends. | ||
|
Pitch 1. 5.10c Start on a ledge up the gully on the left. Climb the crack through several metamorphoses, all of them unpleasant, to a belay. Pitch 2. 5.10c Climb the continuation offwidth. Ab off. | ||
| Yarii! Naginataa - Spear! Halberd | 5.11c* | 30m |
| Well I don't know what that means. A tough slab pitch on dirty rock. Rarely climbed. Take Friends 2-3 for the start. | ||
| Climb direct past flakes to the first bolt. Move left and up to bisect the traverse of Kakushi Toride no San Akunin, then make hard moves past a flake to a lower-off. Optional second pitch up the wall and slab behind the belay. | ||
| Kakushi Toride no San Akunin - The Hidden Fortress | 5.10d* | 25m |
| A varied pitch, but lacking something. Quality, perhaps. Take a rack. | ||
| Climb the slab to a corner to an overhang. Traverse left under this to a flake. Continue left by a hard move past Yarii! Naginataa, then step off the crag onto a ledge with a meaty tree. Ab off. | ||
| Tobidase Seishun - Go for It, Youth | 5.10a* | 70m |
| The big corner-crack-cum-chimney line. The second pitch is now filthy. The first pitch seems to get traffic. Take a rack and something abnormally big. | ||
|
Pitch 1. 5.9 Climb the wide crack in a corner on the left of the recess to a situ belay on a big spike. Pitch 2. 5.10a Climb the dirty hand crack above into a dirtier chimney and grind upwards to a stance. Pitch 3. 5.9 Grind on to the top. | ||
| Chi-lites/Punk | 5.9* | 45m |
| A trying time connecting two chimneys. Take a lot of bigs. | ||
|
Pitch 1. 5.9 Climb the big chimney in the centre of the recess to a belay. Pitch 2. 5.9 Chi-lites pitch 2 climbs the hideous continuation above the belay, so do Punk instead - move right into a chimney (originally the top pitch of Fighting Mami) and climb this to its top. Ab off a tree if the bolts are as grotty as they used to be. | ||
| Fighting Mami | 5.11a* | 25m |
| Another big dirty crackline. Take a rack. | ||
|
Pitch 1. 5.11a Join up the less continuous chimneys/wide cracks to the right to a belay. Pitch 2. 5.10a Traverse out right to a handcrack. Climb this to a belay. Ab off or climb an easier continuation pitch to the top. | ||
| Siberia Tetsudou - Siberian Railway | 5.11a** | 25m |
| A slightly less intimidating crack than its neighbours, though harder than most of them. Take a rack. | ||
| Start at the right end of the recess. Pull steeply into a thin crack and follow this past an odd peg to easier ground. Climb the bolted flake above and finish on a terrace. Ab off. | ||
Toride Iwa - Centre Right
| Koi no Takinobori - Flying Carp | 5.11b*** | 20m |
| Good fingery climbing up the water-worn face. This can usually be climbed even if there's water streaming down to the left. The name's a pun that doesn't come off in English. | ||
| Climb over easy ground to the foot of the face proper. Make a hard move onto the face and continue by sustained, fingery moves to a lower-off. | ||
| Saku no Kuchibue - The Saku Whistle | 5.10d**** | 70m |
| Two excellent pitches. | ||
|
Pitch 1. 5.10c Climb over a subsidiary face to reach the face proper (possible belay), then move up and left to a flake (try not to disturb the bats - they've probably been up all night). Continue direct to a small stance and bolt belay. Pitch 2. 5.10d Move up and right to a dike. Pull onto this, then follow a slightly left leading line to the top. Ab off. | ||
| Main Street | 5.11a*** | 75m |
| The striking crack just right of the subsidiary face is becoming vegetated due to lack of traffic. Pity. Take a rack. | ||
|
Pitch 1. 5.11a Start as for Saku no Kuchibue and gain the crack from the subsidiary face. Follow it past a hard move low down to bolts protecting a kink left. Follow the continuation to a bolt belay on a dike. Pitch 2. 5.10b Climb the slab behind the belay to another dike. Pull into a crack, climb this, then finish more easily rightwards under the tower of Taiyou no Shinden. Climb this or ab off. | ||
| Offroad | 5.11a**** | 72m |
| Superb steep slabbing on the first pitch. | ||
|
Pitch 1. 5.11a After a steep start, climb easily up to a dike left of a flake. Follow the dike left (crux), then climb direct, passing an overlap, to a bolt belay on a good ledge. A sustained pitch. Pitch 2. 5.10d Make a desperate move onto the slab behind the belay. Follow the left edge of the slab more easily to a bolt belay. Ab off, or climb Taiyou no Shinden. | ||
| Kyoseki Densetsu - The Legend of the Megalith | 5.11a*** | 70m |
| Another cracking steep slab route. | ||
|
Pitch 1. 5.11a Climb direct right of Offroad to a bolt belay on a small ledge below the main dike. Crux just below the ledge. Pitch 2. 5.10c Pull onto the dike behind the belay. Follow the bolts to a traverse left into Offroad at the top. Ab off, or climb Taiyou no Shinden. | ||
| Taiyou no Shinden - The Temple of the Sun | 5.10d** | 20m |
| A good pitch, not lacking in exposure. Take a rack and go heavy on the bigs. | ||
| Climb the face to a slanting crack. Follow this to a ledge, then move left to another crack. Follow this to the big top. Ab off. | ||
| Apache Crack | 5.10c** | 45m |
| A good crack on the first pitch, but becoming overgrown above through lack of use. Take a rack. The top pitch is usually omitted. In fact, in 2015, there is an anchor at the top of the arching crack, but think twice before trusting it! | ||
|
Pitch 1. 5.10c Layback the arching crack (crux) to a continuation handcrack. Up this to a belay on a ledge. Pitch 2. 5.10b Climb the easier continuation crack past a kink left and right and a dodgy mantel to a bolt belay. Ab off. | ||
| Just Four Years | 5.11b* | 20m |
| Short and steep. Take a rack. Be very wary of the bolts! | ||
| Climb disjointed cracks to the right edge of an overhang. Traverse left using a crack overhead and pull round to a lower-off on the right. Originally the route climbed a second pitch up the off-width above the lower-off (5.7). | ||
| Mitsurin no Madonna - Madonna of the Jungle | 5.11a* | 50m |
| The big crack left of the fang needs some big gear. An impressive line, but a bit grotty. | ||
|
Pitch 1. 5.11a Climb the crack somewhat unpleasantly to a bolt belay at a dike. Pitch 2. 5.10c Climb the impressive handcrack above and wander left to belay. Ab off, with care. | ||
| Western Lariat | 5.10d* | 20m |
| A disappointing route centred on the intimidating twin cracks above the fang. Take a rack. | ||
| Start right of the fang. Climb over broken ground past a peg to the twin cracks. Struggle up these to a belay on the ledge on the right. Ab off or climb Sugar Apple Slab. | ||
| The Arm | 5.11d** | 20m |
| A hard variation on Western Lariat. | ||
| Climb as for Western Lariat, but use only the righthand of the double cracks. Ab off or climb Sugar Apple Slab. | ||
| Sugar Apple Slab | 5.10c** | 50m |
| Take Friends 2-3. A good slab pitch, but... | ||
| First you have to get there. Climb the slab from the top of Western Lariat easily at first to a flake. Crux moves past this lead to easier climbing almost direct to a bolt belay. Ab off. | ||
| Nineteen | 5.11b*** | 35m |
| A good, worrying pitch linking the disjointed cracks left of Jigoku no Mokushiroku. Mostly bolted, but take some medium and big Friends (2 and up). | ||
| Follow the disjointed cracks by some insecure moves as they jink you up and left to a lower-off. Currently in need of some loving care. | ||
| Jigoku no Mokushiroku - Apocalypse Now | 5.11b**** | 40m |
| An Ogawayama classic and a veritable panic factory. Cleaned and rebolted in 2017 - get on it! There are 6 bolts, but you'll still need a full rack. Double-rope recommended for drag, required to get down. | ||
| Start at a short corner where the path begins to slope up. Climb the corner to a high bolt on the right. Clip this then drop down and traverse nastily left to the base of a crack. Use this to reach another short crack. Climb this and make a hard move onto the face. Step left past 2 bolts close together, then climb a series of cracks till forced left to a steep slab under an overlap. Traverse left to a shallow flake and follow this to an anchor. | ||
Toride Iwa - Right End
| Natsu no Owari - The End of Summer | 5.11b* | 30m |
| The slab 10m up and right has some good moves and a bold finish. | ||
| Start just left of where the vegetation is winning. Climb direct to the first bolt, then diagonally left till below a couple of dikes. Mantel these, then finish slightly right at a lower-off next to a big dead tree. | ||
| Ginga Tetsudou 999 - Galaxy Railway 999 | 5.9 | 25m |
| The big flakeline to the right is now filthy. Take a rack. Or a holiday - you probably need one if you're contemplating this. | ||
| Gain the base of the flake any old how and follow it as it arches left then straightens. Pull into a ramp and move up this to the lower-off of Natsu no Owari. | ||
| Gyakkousen - Shadowline | 5.10a | 25m |
| The line of dirty cracks and corners a few metres up the slope right of Ginga Tetsudou 999. Take a rack. | ||
| Climb the crack through various degrees of hardness - in terms of both difficulty and rock quality. There's a nasty wide bit (aren't they all) at two-thirds height. Ab off. | ||
| Right End Line | 5.8 | 25m |
| The big flakeline pulling out of the crack right of Gyakkousen goes in three pitches. I couldn't work this out from the topo. | ||
|
Pitch 1. 5.7 Climb the crack then pull right into the flake. Climb this and belay at its end. Pitch 2. 5.8 Pull left to a continuation flake and follow this to belay on a ledge below an obvious hand-traverse. Pitch 3. 5.8 Traverse right and pull up to another flake. Climb this for a few metres then go left to belay. Ab off. | ||
| Gambaranakucha - Gotta Go for It | 5.8* | 25m |
| An obvious crack in a face set up and right of Toride Iwa. So obvious, I couldn't find it. Take a rack. | ||
| Climb up to the wide crack and enter it at a chockstone. Climb the crack to its end, then make a couple of slabby moves to the top. Ab off. | ||
Genki ga Deru Slab - Feelgood Slab
The tapering slab in the woods opposite Pocket Mantel.
Follow the hiking course past Pocket Mantel. Where a log bridge crosses a small stream, drop down and follow it (the stream) down to the big stream. Confused? Don't worry, you're not lost yet. Just past a big ugly rock on the right (Sendou Iwa), a stream runs down from the right. Look up and slightly left to see the foot of Genki ga Deru Slab about 70m up the slope. There used to be a path dropping down from the left edge of the Pocket Mantel crags to the main stream, then heading straight up the opposite bank. You're welcome to try.
| Rollcake | 5.9 | 15m |
| The fissure that bounds the slab on the left. The grade assumes the route is clean and dry. Which it isn't. | ||
| Swim up the crack then follow a line rightwards into Water Chute. Move up the crack a couple of metres to a lower-off. | ||
| Water Chute | 5.11a** | 25m |
| The central line. Worth an extra star if clean and dry. Quite bold, too. Take some medium Friends for the cracks in the dike. | ||
| Climb direct to the second bolt. From here, step right then smear up and mantel onto the dike. Smear up again, then move up and right to the crack (possible belay). Move up, then back into the centre of the slab, crux. Continue to a lower-off. | ||
Sendou Iwa - Meditation Rock
The luminous slabs by the stream below Pocket Mantel. Not worth a visit, unless you've got a thing about moss. I paid a visit once, but not much attention, so treat the entries with caution.
Follow the hiking course past Pocket Mantel. Where a log bridge crosses a small stream, drop down and follow it (the stream) down to the big stream and so to a big ugly rock on the right. I think this is it.
| Hidari Ue Crack - Upper Left Crack | 5.11a | 15m |
| Take a rack. | ||
| After a visit to your local gardening centre, find and climb the crack up and round to the right (?) of the front face. | ||
| Shiki - The Four Seasons | 5.7 | 15m |
| The hideous cleft on the front of the buttress. | ||
| Climb and regret. | ||
| ShunKaShuuTou - Spring, Summer, Autumn, Winter | 5.10a | 15m |
| The crack breaking left from the hideous cleft. | ||
| Climb and regret. | ||
| Green Pepper | 5.11c | 18m |
| Once a bit of a classic. Not anymore. | ||
| Climb the wandering bolted line up the dirty slab round to the left. | ||
Kamoshika Side Rocks
Ten minutes along the Kamoshika Hiking Course after the stream where you turn off for Toride Iwa, the path doglegs right then left under a curtain of rock. This area went without a name for ages and became known by the name of its Number One route, Pocket Mantel. In the latest guide, it is called Kamoshika Side Rocks, which seems fair enough.
Birdwatching Rock
Where you turn left to walk under the main wall, follow the wall right, off the path for 15m under a dirty slab with twin bolts (Offside). Continue right (don't climb up to the slab) and skip round a rock step to fixed ropes in a corner. Heave up these and tree roots to a semi-ledge and good trees. The routes are on the wall on the right (just in case you hadn't noticed).
| Kibitaki - Narcissus Flycatcher | 5.10c*** | 13m |
| A very good crack pitch. Take a rack, no need for the bigs. | ||
| Climb the lefthand crack to a tree. Crux where it thins just before the top. | ||
| Ooruri - Blue and White Flycatcher | 5.8** | 15m |
| Much more enjoyable than it looks! Take a rack. | ||
| Climb the righthand crack to a lower-off right of a perched block. More of a face route than a crack route. | ||
| Bluebird | 5.11c* | 18m |
| A top-rope problem up the face right of Ooruri. It could do with some kind soul bolting it up. | ||
| Start as for Ooruri. Traverse out right low down to the first dike, then mantel three or four times to the top. | ||
| Albatross | 5.11c* | 21m |
| The right arete of the face, climbed mainly on its left. You'll be wanting a rack. | ||
| Start at ground level (well, obviously...). Climb the arete past a stubborn bulge to finish airily above the trees. | ||
Meanwhile, back on the dirty slab...
| Ki ni Naru Kante - Anxious Arete | 5.10a | 18m |
| A once pleasant slab now disappearing under lichen. Graded for a clean ascent (clean as in brushed). | ||
| Climb the left edge of the slab (protected by ring bolts) past a dirty break to a ledge. Continue up the arete to a big tree set quite far back. Unless you are willing to trust or replace the situ anchor, I recommend abbing off a lower tree (on the right, facing in). | ||
| Offside | 5.11c** | 20m |
| Another once pleasant slab now disappearing under lichen. I did this in 2015, wire brush in hand, and really enjoyed it. | ||
| Start 5m right of Ki ni Naru Kante on a ledge behind a tree. Climb direct to the first bolt (2 bolts together), and make very hard moves to stand in a big pocket (crux). Pull up to a ledge (Washi no Su Terasu - The Eyrie), then use a diagonal break to get established on the steeper top slab. Step left then pad directly up a scoop to finish at the tree of Ki ni Naru Kante. | ||
Pocket Mantel Rocks
Left of Ki ni Naru Kante, the path runs under a curtain of rock. 10m along, the path steps up where the rock juts out into it.
| Hatsunetsu no Machikado - Busy Street Corner | 5.10b*** | 16m |
| A neat, underrated and often underestimated pitch. Take Friends 2~3. | ||
| Start at the rise in the path, at the left edge of a slim, protruding face with a juggy dike at its foot. Mantel onto the undercut dike, then climb shallow cracks to a good dike. Pull up to the base of a crack and layback this to a lower-off. | ||
| Pocket Mantel | 5.10d**** | 25m |
| An excellent, sustained pitch, high in the grade. Optional Friend 3-ish for the top crack. I haven't seen any details of the line of bolts breaking out right from the ramp. | ||
| Start about 20m along the path from Hatsunetsu no Machikado, below the left edge of a ramp. Climb a shallow cornery thing to a high first bolt. Step across and smear along the ramp to its end. Pull up and make a baffling mantel onto the big pocket. (Be Warned: After rain, this pocket can be full of icy water and/or uncharted ecosystems!) Next climb from dike to dike diagonally left to a stopper steep bit. Thin moves up (crux) gain a crack leading to a lower-off. A 50m rope will just do it. I don't remember seeing this, but there is apparently a slab finish behind the belay (40m to the ground). | ||
The next two routes start another 20 metres along the path. They should become more popular since rebolting and the removal of the huge fallen tree that blocked the start of Kemonomichi.
| Kemonomichi - Animal Tracks | 5.10c** | 27m |
| Good, varied climbing. Take a rack. | ||
| Start at a green slab a few metres right of a crack that becomes a corner. Climb to the first bolt, clip, then move left to the corner. Climb this till it blanks out, step left, then climb pretty much directly to the top. There used to be a belay anchor just after the step left, but I don't know if it's still there. | ||
| Bhutan | 5.10d** | 26m |
| The non-line to the left. You'll be wanting Friends 2-3. | ||
| Start by climbing a baby slab next to the main jobby. Go left to a vague crack, then cut up right through an overlap (crux) to a better crack. Offload your Friends, then head up to the top slab. Climb this past a couple of dikes and a devious dink left to the top. Ab off. If it is still clean, this top slab is great. Otherwise, go fish. | ||
Hakoya Iwa
There is quite a lot of rock situated just up and left of the Pocket Mantel Rocks. It's not far from the main path, but not immediately obvious, especially in summer. Apart from Fuyu no Izanai, the routes are rarely climbed. The popularity of the area is not helped by the confusing way in which the topos are presented in the current Kitayama guide. I'll try to make a bit more sense of it here.
To get here, follow the Kamoshika Hiking Course past the end of the huge cracked face left of Pocket Mantel. The path starts to zig-zag and passes a large undercut boulder with a big red spot painted just where you wouldn't want to bang your head. In 2015, a length of black and yellow rope was strung across here to dissuade hikers from heading up to the rocks. For Fuyu no Izanai etc., break off from the path to the waterfall, dip under the rope and zig-zag up to a whitish face.
Hakoya Iwa - Lower Right
This is the biggest of the bunch. Two slanting terraces cut across the rock. These can be walked/scrambled into and out of on the right. You can climb in from the left, but I wouldn't recommend it. The first routes approached are, not surprisingly, on the bottom tier. Described from left to right, down to up. Apart from the unreported route and Green Flash, all routes require a rack.
| Unreported | 5.11a* | 20m |
| The line of bolts up the steep face to the right of a cracked white wall. | ||
| Climb the face. The first half is very sustained, but the climbing eases with the angle. | ||
| Fuyu no Izanai - Winter Calling | 5.10c*** | 52m |
| A 3-pitch crack route, with an escapable stop on each terrace. The second pitch is popular and, for many climbers, the only reason for visiting this crag. | ||
|
Pitch 1. 5.9 16m. Climb the first prominent crack from the left. There is an awkward section over a bulge at two-thirds height. Belay on the terrace. This is also a good pitch in its own right. Pitch 2. 5.10c 12m. Climb the central crack to a niche. Hard moves out of this lead up and left to another narrower terrace. Pitch 3. 5.10a 14m. Another good pitch. Step right and climb the easier continuation crack to the top. | ||
| Shinrin Yoku - Bathed in Green | 5.8*** | 17m |
| The next crack to the right, leading to a brown flake. An excellent route that deserves more attention. | ||
| Climb a finger crack to a break. Finish steeply up a shallow corner with some booming flakes. There is usually a lower-off in situ on the big tree, or you can continue up to the terrace below the second tier. | ||
| Eien no Ookawa - The Eternal River | 5.10d | 35m |
| This crack starts a few metres down the gully dropping to ground level left of Fuyu no Izanai pitch 2. The steep wide cracks up which the route starts are dirty and very crumbly. | ||
| Climb the wide cracks to a break. Continue much more easily, but still painfully, in a direct line up disjointed cracks to the top. Scramble carefully off to the right. | ||
| Green Flash | 5.11a* | 14m |
| This is a top rope problem up the face left of Fuyu no Izanai pitch 2. | ||
| Start just left of Fuyu no Izanai pitch 2. I think stepping off the boulder is OK. Step up to a ledge then power up a runnel to a ledge. | ||
| Kanimodoki - Crabwalk | 5.9** | 40m |
| A rarely climbed 3-pitch excursion that seeks out various weaknesses on its way to the crag top. The first pitch is great fun. It's possible to string pitches together, but you'd get a lot of rope drag. | ||
|
Pitch 1. 5.9 25m. Start as for Fuyu no Izanai pitch 2, but climb the corner on the left to a ledge and traverse this to its end. Drop down and step across to the crack of Eien no Ookawa. Follow this to a small ledge below a band of loose rock, level with the belay at the top of Fuyu no Izanai pitch 2. There are good cams on this ledge and you can also sling the small tree in the loose band. Pitch 2. 5.8 10m. Step up to the small tree and traverse left again (easy but loose) to a short thin crack. Follow this to a good tree on a ledge below a chimney. Pitch 3. 5.6 5m. Climb the chimney easily to the top. Scramble carefully off rightwards (facing in) over the back. | ||
| Ame no Izanai - Rain Calling | 5.10c** | 14m |
| A variation finish to Fuyu no Izanai pitch 2. | ||
| Start up Fuyu no Izanai pitch 2. Step right at the halfway point and finish up a short crack. There is no lower-off. Slink off right or finish up Fuyu no Izanai pitch 3. | ||
| Ame no Izanai Direct - Rain Calling Direct | 5.10d* | 13m |
| A direct start to Ame no Izanai. | ||
| Start directly below the finishing crack of Ame no Izanai, and climb boldly up to join it. | ||
| Yamato Nadeshiko - The Flower of Japanese Womanhood | 5.8** | 23m |
| An enjoyable route up the stepped corner 10m right of Fuyu no Izanai pitch 2. | ||
| Climb the corner all the way to a lower-off in a tree. The first 2 steps are hard and feature some painful jams. | ||
| Fuyu Keshiki - A Winter Scene | 5.7* | 22m |
| The 2-step corner just right of Yamato Nadeshiko is easier and not as good. | ||
| Climb an easy but dirty slab to reach the corner. After the first step, trend left to join Yamato Nadeshiko. | ||
| Haru no Otozure - The Coming of Spring | 5.10a* | 20m |
| A perversely enjoyable route up the mostly horizontal, disappearing crack up and right again. | ||
| Step up to the crack from as far left as possible and then follow it right to the arete on painful jams. Swing up and right onto the filthy slab and then bushwhack up and right into trees to belay. | ||
| Risu no Sampomichi - Squirrel's Cakewalk | 5.9* | 20m |
| Start from the stance at the top of Fuyu no Izanai pitch 2. | ||
| Step left from the belay, then trend left across the face to the finishing off-width of Eien no Ookawa. Thrash up this to the top. | ||
Hakoya Iwa - Lower Left
If you're not sure where you are, it's best to locate Fuyu no Izanai, then follow the line of rocks left for 75m till it ends at a flake leaning against the face. If you know where you are, continue on the Kamoshika Hiking Course past the undercut boulder to another boulder with a red arrow painted on its left and a red cross painted on its right. Break out right off the main path and zig-zag up to the rocks.
The routes are described from left to right, as the flake at the left end is an easily recognisable feature.
| Kirisame - Misty Rain | 5.10b** | 17m |
| The bolted line a couple of metres in from the end of the rock. You can translate the name as "drizzle", but "kirisame" doesn't have the same miserable connotation that "drizzle" does in English. | ||
| Climb up to a short corner and pull out left to a groove. Continue left and up, over steep but juggy ground, to a final pull right to a tree. | ||
| Natsukaze - Summer Breeze | 5.9*** | 17m |
| The prominent crack to the right, which eventually curves left to the tree of Kirisame. | ||
| Climb up to a short corner and pull into the crack above. This gives excellent jams, holds and gear till an awkward sequence flops you out at the big ledge and monster tree of Kirisame. There is a second pitch up the crack behind the tree, but nobody does it. | ||
| Last Train | 5.11a** | 18m |
| The bolted ochre face to the right, leading to a brown flake. | ||
| Climb over easy but filthy ground to gain the face, then follow the bolts as directly as possible to a good ledge and anchor. | ||
| Temptation | 5.10c | 30m |
| A less than tempting climb up the series of weaknesses to the right of Last Train. Take a rack. | ||
| Start about 10m right of Last Train at a dirty crack. Climb this to a flake, which leads left to a crumbly corner. Continue past a break to another corner, then traverse left under a roof to a recess. Climb the short wide crack on the right to the top. | ||
Hakoya Iwa - Upper Left
So, from the start of Kirisame, skip left round the fallen flake, then zig-zag up the steepish gully to the first substantial face on the left. The routes are described as approached, from left to right, with the exception of Inabikari, which climbs the back of the wall with Natsukaze. As you head up the gully, look for a short wide crack leading to an overhang on your right.
| Inabikari - Lightning | 5.9* | 12m |
| Naturally clean (up to the overhang) and low in the grade. Take a rack - you don't need any monster cams. | ||
|
Climb the crack to the hang and layback onto a dirty slab. Lower off the tree on the right. | ||
| Mikake no 5.4 - Looks Like 5.4 | 5.8* | 20m |
| The short wide crack and crack above on the left side of a steep slab with an undercut start. Pleasant enough when dry, this would be excellent with a clean-up. Take a rack. | ||
| Climb the crack (as the name suggests, harder than it looks), step left and either follow a relatively clean crack up the face to trees on a ledge, or step left again to an easier handcrack and follow this to the same ledge. Ab off a tree or walk off to the left. | ||
| Matsuri Bayashi - Festival Music | 5.11b* | 22m |
| Good climbing up the steep slim slab with an undercut start. This has intermittent old (RCC) bolts, but is recorded as a top-rope problem. The (bolted) attractive right arete is a project. | ||
| Start below twin bolts at 6m. Make a hard pull onto the slab, then climb pretty much directly to a crumbly break. Traverse right to the arete, step round this and finish easily past some huge trees. Needs a good brushing. | ||
| Sawayaka - Fresh | 5.9 | 25m |
| A dirty, forgotten route up the face 5m right of Matsuri Bayashi. Take a rack. | ||
| I haven't been able to work out where this goes. It apparently finishes up a chimney right of the prominent brown headwall. | ||
| Wakare no Izanai - Invitation to Part | 5.10d | 30m |
| More dirty forgetfulness. Take a rack. | ||
| Climb to the bolt then traverse left to a crack. Follow this to a shallow corner and, where this ends, make a hard move to a flake, which leads to a ledge below a low-angled slab. There's a bolt on this, somewhere, but we couldn't find it. Climb the slab to a good tree at the top. Note that the direct ab from this tree is 25m. You can also walk off over the back. The crag you can see is Hihi Iwa. | ||
| Deai no Izanai - Invitation to Meet | 5.10b | 27m |
| And more dirty forgetfulness. Take a rack. | ||
| Climb to the bolt then traverse step up and left to a crack. Follow this to its end, then step up into a prominent offwidth crack, which leads to the ledge below the low-angled slab. Climb the slab to the top. | ||
| Sasayaki Kaeshi - Chinese Whispers | 5.10b* | 28m |
| Still more dirty forgetfulness. Take a rack. | ||
| Climb to the bolt then step up and right to the diagonal flake. Follow this to its end, then step up into a straight crack. Climb this and, where it ends, step right into Aki no Sasayaki and follow it to the top. | ||
| Aki no Sasayaki - Autumn Whisper | 5.9* | 27m |
| An interesting, fairly direct route that links a series of cracks up the right side of the face. Take a rack. | ||
| Start up the gully up and right of Sasayaki Kaeshi, below a recess. Climb up to the recess, then climb the attractive straight crack and its almost direct continuations to a ledge with a tree. Go up and left to another ledge below the easy-angled slab of Wakare no Izanai. | ||
| Otakebi - War Cry | 5.8 | 20m |
| A dirty, worrying struggle up the chimney right of Aki no Sasayaki. Take a rack and a spare brain. | ||
| Climb up to the recess, as for Aki no Sasayaki, but then step right and climb the chimney any old how to a ledge with a tree. Ab off, wondering how it came to this. | ||
Hakoya Iwa - Upper Right
Continue up the gully from Upper Left. I'm including 2 routes here that are in fact on the left side wall of Lower Right.
| Mori no Koe - Voice of the Forest | 5.10a* | 25m |
| This starts a few metres up the gully right of Otakebi, below a cave in the right wall. I really enjoyed this, but I can understand why you wouldn't. Take a rack and watch out for crunchy holds. | ||
| Start directly under the cave and climb over blocks into it. Pull out left using a hidden pocket, then fist jam left to a ledge. Make a hard pull into a groove on the right, pull up out of this on jenga and mantel to another ledge below a short headwall. Traverse left to belay on a tree in the gully. It is better if somebody follows to get your gear, and then you can ab straight down the gully. | ||
| Fucking Nut | 5.10b** | 15m |
| A good line but some painful rock. Although the rock is crunchy in a couple of places, the line is clean and the gear is excellent. | ||
| Climb the crack in an ochre groove, just left of a repulsive off-width. Where the crack finishes, pull left into a groove and climb this to a lower-off on a tree. | ||
| Mitsuba - Honeywort | 5.9 | 15m |
| The afore-mentioned repulsive off-width. Monster cams required. | ||
| From the bottom of the crack, turn and run. Alternatively, climb the crack past some bushes to the first available tree. | ||
| Miyako Ochi - Exile | 5.10b** | 13m |
| A good route marred by a dirty finish. Take lots of finger-sized cams with one big one for the top crack. | ||
| Climb the twin cracks to a horizontal break. Move left to another good crack then climb the dirty continuation corner to the top. | ||
| Some Day | 5.10d* | 17m |
| The thin groove above the start of Miyako Ochi gives another route let down by its finish. Take small cams and wires. | ||
| Climb Miyako Ochi to the break. Step up into this and climb the short groove right of the block to finish. Try to resist the temptation to bridge out right. Finish with a dynamic heave on a short crumbly flake. | ||
| Amanojaku - The Devil on My Shoulder | 5.10b* | 40m |
| 2 contrasting pitches, just about worthwhile, but could do with a clean-up. | ||
|
Pitch 1. 5.9 Climb the slab. There are 2 lines: Left (starting off the block) is easier but dirtier and bolder. Belay at a tree on a ledge at half height. Pitch 2. 5.10b Climb the steep crack in the wall behind the tree. To descend, ab the route. | ||
Hihi Iwa - Baboon Rock
A cluster of cracked, vegetated faces over the back of Hakoya Iwa. The existing routes take the best natural lines, but it's all a bit green. To get there, first find Hakoya Iwa Lower Left, then head left and up the hillside for about 100m. Stay right of the big stream bed.
I went up and had a look in 2015. There are 5 routes and they are all horrendously vegetated. Of course, from a vegetarian's point of view, this might not be all that horrendous, but from a climber's point of view, this venue is in serious need of some napalm. Go and climb somewhere else.
Waterfall Rocks
One of the most imaginative names I have come up with, this refers to the crags on the right of the path as it arrives at Karasawa Waterfall. The whole area is a bit gloomy and feels hemmed in, but there are some steep, impressive faces to throw yourself at.
To get there, follow the Kamoshika Trail all the way to Karasawa Waterfall. It takes about 35 minutes.
Kita Kabe - North Wall
The steep slab just off the path before you round the last righthander before the waterfall. This wall was heavily gardened to create the routes but has now returned to the plants. The grades and stars assume the routes are clean, which they aren't. Described from right to left.
| Pegmatite | 5.11a* | 30m |
| This would be a good long pitch with regular traffic, but I'd ask you to leave it so as not to disturb the bats in the top flake. If you do it, you'll need a rack. | ||
| Climb unpleasantly up the bolted line just left of where the gardened section ends (unfortunately you have to dip into the tottering heap on the right for holds occasionally). Dodge the moss garden on the left to arrive at the base of a flake. Follow this then go left to a narrow ledge. Climb direct to a second flake and climb this till it curves back on itself. Pull left and up into the continuation and follow this to the top. Ab/lower off (there's a ring on the last bolt before the flake for climbers with 50m ropes, but I don't know how happy you are about abbing off a single bolt). | ||
| Yubi Ijime Right - Fingerstinger Right | 5.11d* | 22m |
|
The line that skirts the main part of the face on the left. Now very mossy. 2020: Several large blocks rest freshly at the bottom of this slab. You have been warned! | ||
| Climb easily past a couple of small hangs to an overlap. Now it gets hard. Finicky moves on holds that are hard to see and harder to use lead eventually to a tree. Ab/lower off. | ||
| Yubi Ijime Left - Fingerstinger Left | 5.12b* | 20m |
| The face left again is a lot harder than it looks. Now very mossy. | ||
| Start at a low bolt right next to the path. Scruffy climbing up vague cracks leads to a stopper move at their end. Then another. And another. And just for good measure... Ab/lower off. | ||
Tsuki no Tou - Moon Tower
This is just round the corner from Kita Kabe, starting on the last bend in the path before the waterfall. It's easier to work out if you walk past it then look back. This gives you an excuse to gawk at the waterfall, which is pretty impressive after rain. Routes described from right to left. Start the first two by scrambling carefully up onto a terrace right above the bend (fixed rope of dubious provenance in place in 2017).
| Supergirl | 5.11c*** | 35m |
| The centre of the lower slab and the tasty face above provide two very good pitches. | ||
|
Pitch 1. 5.11c Climb the centre of the slab without touching the crack on the left to belay on a good terrace. (If you do use the crack for the last moves, you get a very neat, sustained 10c). Belay at the anchor on the back wall if you're going to do the top pitch. Pitch 2. 5.11c After a hard, pushy start up the arete, climb steeply up to a step right past a crack. The face around this is full of holds and fun. Ab off. | ||
| Takahashi-san no Crack - Takahashi Crack | 5.8* | 12m |
| The bottomless crack left of Supergirl pitch 1. Rack up. | ||
| Clip the first bolt of Supergirl pitch 1, then traverse out to the arete. A tricky move up gets you to the crack proper. Good moves on good gear take you to the halfway terrace. Serious for the grade because of the atrocious gear lower down. Ab/lower off. | ||
| Startline | 5.10c* | 20m |
| The fierce-looking crack starting on the right arete of the left face actually gives a bit. Take a rack. | ||
| Hard moves through an undercut gain a crack in a groove. Follow this to gain a straight crack on the left, and climb this to the terrace. Ab/lower off. | ||
| Michi - The Path | 5.12c*** | 43m |
| A long and tough continuation to Startline that finishes in a sensational position. There are other possible meanings for 'Michi', but this will have to do for now. | ||
| Climb Startline till the crack straightens. Traverse left to a flake, then make scratchier moves up and left to a bulge. Pull through this on good (by comparison) holds, then climb the top face and slab, via a sneaky deviation left and back, to an anchor. | ||
Taiyou no Tou - Sun Tower
This is not obvious as a tower when seen from ground level. It is gained by zig-zagging about 50m up the gully between Startline and the waterfall. The tower is bounded on the right by a grotty gully with a fixed rope trailing down its right wall. Routes described from right to left, down to up.
| Yubiwa Monogatari - The Lord of the Rings | 5.12a* | 35m |
| A mixed bag that suffers from its surroundings as much as anything. Take a rack. | ||
| Climb the face just left of the grotty gully (you're allowed to bridge in to start) past a series of flakes to a crack. Pull right to another crack and climb this to a choice of lines up the headwall. Pancake out to belay on a good terrace. Ab off, or climb a route from the terrace. | ||
| Natsu no Hi - A Summer's Day | 5.12b** | 25m |
| Another disappointing route up the face left of Yubiwa Monogatari. Take a rack. | ||
| Climb the centre of the face till forced ever closer to the left edge (and Puzzle). Use a crack on the left to gain a ledge round to the left (at the top of Puzzle). Ab/lower off. | ||
| Puzzle | 5.11a*** | 25m |
| The face to the left was the final of the first Japan Cup climbing competition, way back when 5.11 was impressive. Take some medium cams for the crack. | ||
| A steep start over on the left leads you back over a bulge to the centre. Follow a confused line of bolts up and slightly left to an overhang (basically, Puzzle follows the leftmost line). Pull through and reach for a crack and good holds that take you up and right to a well situated ledge. Ab/lower off. | ||
| Kenken no Miminari - The Ringing in Kenken's Ears | 5.12c** | 25m |
| The face above the top of Puzzle. Exposed and necky. Take wires and small friends for the crack. In fact, take a rack, because I haven't got a clue what's up there. | ||
| Climb the right arete to another ledge. Go left under a bulge to a diagonal crack and follow this to its end. Keep going left to the arete and climb this on its left to the top. Ab/lower off. | ||
The next routes start from the ledge at the top of Yubiwa Monogatari. This is best gained by scrambling round to the top and abbing in. Your alternative appears to be that fixed rope!
| Heavenly Bodies | 5.10c* | 15m |
| The wide crack in the centre of the back wall. You can't really expect much when the best you can look forward to is when the crack becomes a chimney. | ||
| Climb the crack all the way. A bolt at half height makes up for the bongs and things you haven't got. | ||
The bolted lines to the left and right of Heavenly Bodies are abandoned projects.
| Tsuna Crack | 5.8* | 17m |
| The corner crack starting from the terrace. Quite pleasant when it gives up being manky. Take a rack with lots of mediums. | ||
| Climb the corner crack. | ||
| Natsu e no Tobira - The Door to Summer | 5.9* | 18m |
| The crack of Heavenly Bodies is just as wide on the opposite side of the tower. | ||
| Climb the crack all the way. Fortunately, not as steep as it is on the other side. | ||
Hoshi no Tou - Star Tower
About 20m further up the gully from Puzzle, there is a very impressive black granite wall with a cluster of undecided cracks in its centre. Word is, there used to be several top-rope problems around here, and these two got cleaned up.
| Tehran Hokui Sanjuu Roku Do - Tehran 36° North Latitude | 5.12c*** | 23m |
| If anyone can make anything of the name, please let me know. This climbs the lefthand of the diverging cracks in the main face. Take a rack. | ||
| Climb easily up crumbly rock to a bolt in the centre of the face below diverging cracks. Follow the left fork up to and past a break. Move up to a flake, clip a bolt, then go left to another flake and a lower-off. My mate said his mate did it and he said it was good. So now you know. | ||
| Hoshi no Hito - Starman | 5.11b** | 25m |
| The righthand line. Rack up. | ||
| From the bolt in the centre of the face, follow the right fork up to the break. Pull up and across to the arete, then trend back left to a tree. Ab off. | ||
Tsuki no Ura - The Dark Side of the Moon
A short way up the gully from Hoshi no Tou, there is a steep face on the left with a striking corner capped by an overhang (Eclipse). The face gets no sun year round.
 |
| Eclipse | 5.11a*** | 18m |
| A superb line spoilt by a fiddly start. The more Camalot #3s/Friend #4s you have, the happier you'll be. Did I mention that it takes forever to dry? | ||
| You can start the corner direct, but the rock is crap. It's better (but harder) to traverse in from the right. Layback, fist jam or thrutch to the big overhang, then traverse quickly left (possible rest) and climb a short cracked face to a ledge. Lower off, but take care with how your rope runs. | ||
| Brain Damage | 5.10a* | 12m |
| The short crack just right of Eclipse is nice enough, but getting there isn't. You don't need any big gear. | ||
| Thrutch over a bulge to the crack, then climb it pleasantly to a lower-off. You can scramble round to start the crack above the thrutch, but the terrain is a bit dodgy. | ||
Area 51
This area is based on the stream that drops into Karasawa Waterfall. There are rocks on either bank of the stream and remnants of long-ago forestry work here, there and everywhere. The routes described here are on the first 2 substantial crags on the right flank, as approached from the top of the steep gully.
To get there, first follow the Kamoshika Trail to Karasawa Waterfall. Next, head up the gully between the waterfall and Tsuki no Tou to Puzzle, and continue up the main gully as it narrows to its top. This requires some scrambling and there are some fixed ropes to aid progress. From the top of the gully, follow a hacked path left through rhododendrons to a clearing below a crumbly boulder.
| Number |
Crag Name (Click to Get There) |
| 1 | Roswell Rock |
| 2 | Enban Iwa |
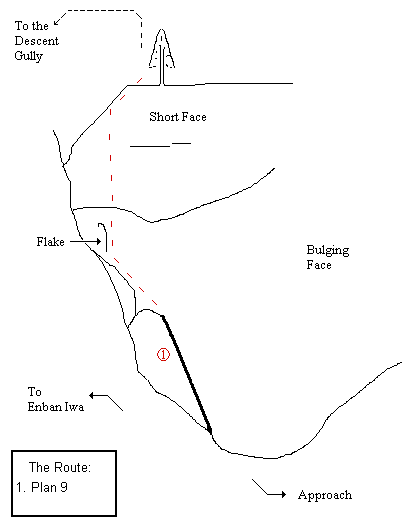
Roswell Rock
This is the first large buttress west of the top of the approach gully. This has a steep, juggy and not very solid-looking southeast face. At its lowest point, there is a unique slanting chimney formed by a huge slice of rock slipping away from the main face. Plan 9 starts up this then weaves up the slighter southwest face.
Approach by dropping down slightly from the clearing below the crumbly boulder, then following a path with cairns across the slope to a usually dry stream. Cross this and head into bush, following a rising path to the obvious slanting chimney of Plan 9. It should take about 5 minutes from the crumbly boulder.
 |
| Plan 9 | 5.10a** | 25m |
| Climbs the obvious chimney then works a way up left to the top of the rock. Take a rack. | ||
| Huff and puff to the top of the chimney (so bad it's good). The thinner you are, the deeper you can go, and the more solid the rock. You also get to use a couple of big chockstones and some hidden cracks on the left face. At the top of the chimney, move left along a ramp to reach a flake and use this to pull steeply up to easy slabs. Follow the easiest line to a good tree at the top of the rock. Ab off or bushwhack back and then left to the gully. | ||
Enban Iwa - Saucer Rock
The large, blocky buttress to the left of Roswell Rock has some good rock and gets plenty of sun. The 3 wide cracks at 20m offer a good marker.
To get there, follow the marked path from the clearing below the crumbly boulder to the obvious slanting chimney of Plan 9. Continue left and up to another dry stream, cross this and follow another cleared path to the toe of the lower slab of Enban Iwa. It should take about 10 minutes from the crumbly boulder.
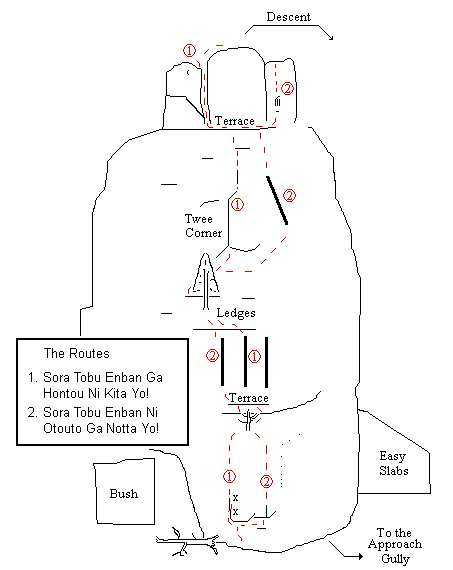 |
| Sora Tobu Enban ga Hontou ni Kita Yo! - I Really Saw a Flying Saucer! | 5.10d*** | 65m |
| A lovely jaunt. Take a rack with a thin sling for the thread on Pitch 1 and one big cam for the crack on Pitch 2. | ||
|
Pitch 1. 5.10d (22m) Climb easy slabs to a grooved rib above an overlap. Place a thread runner at the base of the rib and stretch to clip a bolt. A neat sequence past this and the next bolt gets you stood on the easier-angled upper slab. Pad carefully up this to a tree below a terrace. Pitch 2. 5.9 (14m) Pull up right behind the tree to the terrace and climb the centre of 3 wide cracks to a huge tree on a spacious ledge. Pitch 3. 5.10b/c (16m) Scramble right over blocks to a lovely little corner. Climb this by technical bridging to easy-angled slabs, which lead to the ledge below the summit blocks. Pitch 4. 5.8 (13m) Climb the unprotected chimney. If this doesn't appeal, walk through the chimney, turn round, then climb the short face on the right to stand on the detached block. Steady yourself, then step across the top of the chimney and scramble to the summit proper. Belay on gear and/or trees. | ||
| To descend, walk right (east) and drop down into rhododendrons. Follow the slope down, keeping the rock close by on your right, to the start of the route. | ||
| Sora Tobu Enban ni Otouto ga Notta Yo! - My Brother was Taken by a Flying Saucer! | 5.8*** | 70m |
| Quite an adventure, especially considering the approach. Take a rack with a thin sling for the thread on Pitch 1 and one big cam for the crack on Pitch 2. | ||
|
Pitch 1. 5.7 (24m) As for Sora Tobu Enban ga Hontou ni Kita Yo!, climb easy slabs to a grooved rib above an overlap. Place a thread runner at the base of the rib, then traverse right under the overlap to a shallow crack (cams). Pull over and climb the slab easily but without gear to a tree below a terrace. Pitch 2. 5.8 (12m) Pull up behind the tree to the terrace and climb the lefthand of 3 wide cracks to a huge tree on a spacious ledge. Pitch 3. 5.8 (21m) Scramble right over blocks past the base of the corner to a shelf leading right. Follow the shelf to a short wide crack and climb this to the ledge below the summit blocks. Pitch 4. 5.8 (13m) Walk right to an undercut corner. Climb its right wall by a high step and fun with flutings to good block/tree belays just below the summit. | ||
| To descend, step up to the summit, walk back to the woods, then drop down right (east) into a gully full of rhododendrons. Follow the slope down, keeping the rock close by on your right, to the start of the route. | ||