
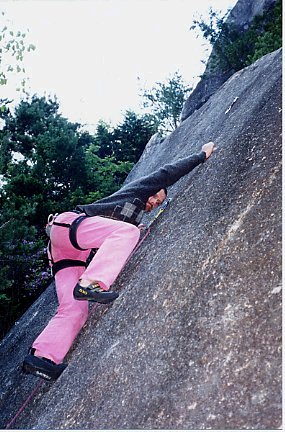
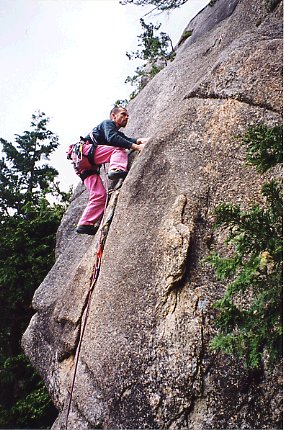
Slab Jou Ganpeki - Slabby Walls
This is the pile of slabby faces just past the big rockfall on the right of the Kimpu-san Highway. There are one or two gems to be found, especially higher up the hillside. Almost all the routes are on excellent rock.
Note: The ban on climbing at Gamma Slabs has been lifted.
Some of the routes on the lower slab are now longer than they used to be.
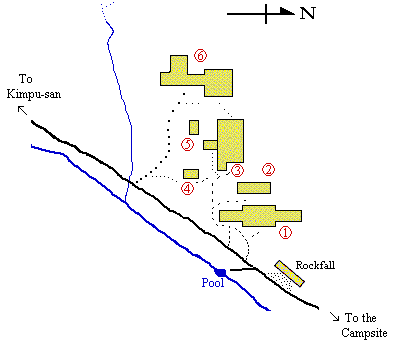
| Number |
Crag Name (Click to Get There) |
| 1 | Gamma Slab |
| 2 | Gamma Face |
| 3 | Zoku Ojisan Iwa |
| 4 | Gamma Main |
| 5 | Puchi Rock |
| 6 | Gamma Summit |
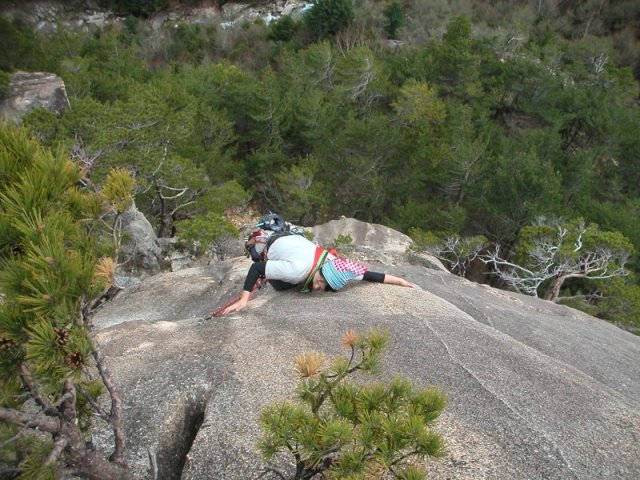
Follow the Kimpu-san Highway past the chain and past the entry for Sagan Slab. The track then detours round a big rockfall on the right (Nightnurse RIP) and, about 50m after this, a huge cairn marks a small path leading up in 50m to the base of a broad, low-angled slab, which offers a choice of first pitches for Gamma Route. This path then skirts the slab on the left and leads up to the slab containing Gamma Route pitch 2. The path from the second cairn on the Kimpu-san Highway leads directly to the left edge of the lower slab. (Point of interest: After the rockfall, a track forks left to the river - a superb spot for a dip.)
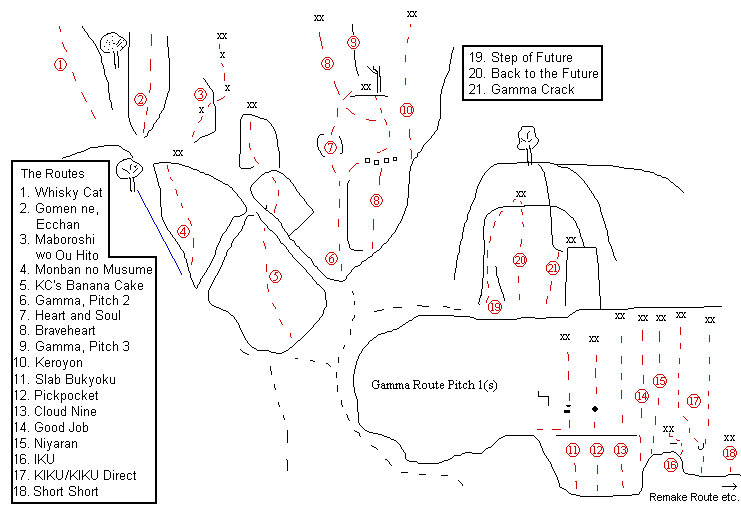 |
The Lower Slab
| Gamma Route | 5.9*** | 115m |
| An enjoyable long outing, somewhat spoilt by the walks. There are several bolts on the route, but you'll still need a light rack and a lot of slings. The flake on Pitch 5 takes a bomber Friend 4. | ||
|
Pitch 1. 5.7~ Pick a line up the slab. The first four or five lines from the left (up to and including the line that pulls up a neat white flake) are 5.6 - 5.8. Whichever pitch you choose to take, from the top-left of the slab, follow a path left to the start of the second pitch - a neat slim flake starting from the toe of the main slab. Pitch 2. 5.9 Layback the flake to the bolt at its end and traverse right along a dike. Smear up a white scoop to gain better holds and a ledge with two old trees and two spanking new chains. Pitch 3. 5.8 Climb the easy slab behind the belay to a steep corner, passing possible belays on the right and left. Climb the corner, then belay at a tree in a gully. Pitch 4. --- Scramble right up the gully then left across easy slabs to a wooded slope. This is very easy, but beginners may require a rope. Walk about 20m diagonally left to the base of pitch 5. (Note: Pitch 5 starts up a juggy slab left of a gully and heads to an obvious curving flake in a slab up and left. If you're standing below a scruffy wall heading into treed slabs, and the first runner is a peg, possibly with red tape on it, you're too far up and right.) Pitch 5. 5.9 Climb the easy slab for 10m to a steep section by a small tree. Pull up onto the next slab using a superb pocket, then continue to the big flake. Pull over this (crux) onto the top slab and continue to a big terrace. It is possible to make a 5.7 detour up the gully and crack to the right and to split the pitch at trees in the gully. Pitch 6. --- Make a scary step into the bottom of the bottomless gully (yes, I know) behind the belay then head up the gully to a good viewpoint on the ridge. Rope up as required. Pitch 7. 5.4 Meander up the sleeping slabs to the top - a great spot for a picnic. Rope up as required. Watch you don't drop any gear into the deep cracks. | ||
| To descend, ab off down the back (i.e. down the impressive face of the top pitch of Kaze to Tomo ni Sarinu). If you have two ropes, you can get down in one ab, but tie a knot in the ends and head left (facing in). A short walk leads down to the path below Magga Slab. If you have one rope, ab to the anchor on the lower ledge below the steep face (the second anchor down - this is the top of Pitch 2 of Kaze to Tomo ni Sarinu) and ab again from here. Both abs are almost, but not quite, 25m. | ||
Further right, the base of the slab drops away. This expanse of slab was extensively developed in 2010 and further opened up by a typhoon in 2018. The routes are described from left to right, starting down and right from the white flake. (The old topos record a line at 5.10b up the slab between NewGam1 and NewGam 2, climbed without touching any of the big pockets.)
| Slab Bukyoku - Slab Dance (NewGam 1) | 5.8** | 23m |
| Pleasant slab climbing, the cleanest of the new bunch. | ||
| Start directly below two big pockets, one above the other. Climb the scruffy lower slab past a poor peg to a flake and follow this to a lovely jug at a long horizontal ledge/break. Pull up to the pockets and continue pleasantly to finish direct up the easier angled top slab. | ||
| Pickpocket (NewGam 2) | 5.10a** | 22m |
| More pleasant slab climbing, this time with a stiff crux. | ||
| Start directly below the huge pocket about 3m right of Slab Bukyoku. Climb to the pocket and make a hard sequence to escape this. Finish direct up the easier angled top slab. | ||
| Cloud Nine (NewGam 3) | 5.9* | 28m |
| Yet more pleasant slab climbing, but still a bit dirty up top. | ||
| Start just left of where the base of the slab slopes up and right, below a shallow corner. After a steep pull, climb easily to the corner and continue to a horizontal break. Make a tricky pull onto the top slab, then climb quite boldly up the scruffy slab to a lower-off. 60m rope required. | ||
| Good Job (NewGam 4) | 5.9* | 27m |
| And more of the same, also a bit dirty up top. | ||
| Pull over a bulge right of Cloud Nine (or traverse in from higher up the slope on the right) and then climb direct past the break to the lower-off of Cloud Nine. 60m rope required. | ||
| Niyaran (NewGam 5) | 5.8* | 27m |
| Good Job's twin, minus the steep start. Can't work out the name. | ||
| Pull onto the slab right of Good Job (left of a ring bolt) and then climb direct past the break to a lower-off. 60m rope required. | ||
The next 3 routes start further right again. The bottom few metres of each route are dank and dirty.
| IKU (NewGam 6) | 5.11a** | 13m |
| The start is hard and technical and can be gritty. | ||
| Start round to the right of the vegetated right edge of the main slab below a big flake. Scramble leftwards up 5m of dirt to a bolt left of the flake. Clip and make a hard sequence on sideholds and underclings to a foothold on the left. Balance left and clip, and then move back right and pull onto the top slab right of a suspect blob. Step left to twin bolts to finish. | ||
| KIKU (NewGam 7) | 5.9** | 24m |
| A steep, juggy start is followed by a solid but scruffy slab. | ||
| Start as for IKU, but instead of scrambling up left, climb real rock to the big flake. Pull up onto the flake, then head slightly left to gain the top slab. Finish pleasantly enough up this. Take care not to disturb a rather delicate pancake of rock just below the lower-off. | ||
| KIKU Direct | 5.9** | 24m |
| A variation top slab to KIKU. | ||
| Follow KIKU to the big flake. Pull up onto the flake, then pull right into a recess. Continue up and slightly left to gain the top slab. Finish pleasantly enough up this. | ||
| Short Short (NewGam 8) | 5.10b* | 12m |
| A steep climb with some good moves on suspect rock. | ||
| Start about 6m right of IKU. Pull steeply up just right of an alarmingly perched block to a good undercut. A difficult reach from this gains a boss and an easing in angle. Lower-off. | ||
| Remake Route (NewGam 9) | 5.9* | 25m |
| A bold, dirty start leads to a good steep finish. | ||
| Start about 6m right of Short Short. Climb the dirty old slab any old how to a break and good gear. Pull out right onto the steep wall and heave quickly past 2 bolts and a short crack to twin bolts. Lower off. (The continuation slab is bolted, and pleasant enough, but there is no anchor. If you do it, you have to head quite a way up to find an abbable tree.) | ||
| Papazuru - P-puzzle (NewGam 10) | 5.10b* | 15m |
| Big pulls on big holds. | ||
| Start about 5m right of Remake Route. Climb the scruffy lower slab to a steep wall with an obvious white jug. Heave up to and onto this and press on to less steep ground and a lower-off. | ||
| Mi Agereba Slab - Slab on a Stick (NewGam 11) | 5.10b* | 13m |
| A short steep section leads to a longer thin slab. | ||
| Start 2m right of Papazuru on a higher terrace. Pull up the steep wall, with a tricky move up onto the slab. There's not much for the hands on the slab, but the friction is gecko-grade. Lower-off. | ||
The next routes climb the area of rock containing Gamma Pitches 2 and 3, which is gained by skirting the lower slab on its left. The path from the lower tier arrives at the toe of the slab, from which KC's Banana Cake starts. Routes described from left to right:
| Monban no Musume - The Gatekeeper's Daughter | 5.9* | 13m |
| A just worthwhile slab route taking a slanting line up the left edge of the lower slab. | ||
| Start from the fixed rope leading up to Whisky Cat etc. Pull onto the slab at twin bolts, then step left and follow the left edge of the slab to a faint overlap. Make tricky moves through this to better holds, then step up to a lower-off. | ||
| KC's Banana Cake | 5.10a** | 30m |
| A disjointed but fun slab route with a tricky finish. | ||
| Start at a small slab down and left of the main slab. Climb the centre of this to a gully on the right. Stride across between the trees and climb the continuation line up the next slab to another ledge. Finish up the short steep face above (crux). If you're using a 50m rope, ab or lower off as far as possible to the right (facing in), then scramble carefully down trees and choss for the last few metres (you can just about ab to the first bolt to clean the route then swing right to easy ground). | ||
| Heart and Soul | 5.10b*** | 26m |
| Tasty slabbing with a spicy crux. | ||
| Climb the thin flake as for Gamma Route pitch 2. From the dike climb direct by thin moves to a sloping mantel (using the white line of holds on the left makes it 10a; the pegs up and left take you off-route). From here, it is best to step right and finish up Braveheart (this is 26m and you can just get down on a 50m rope), but it is also possible to continue right to the chains on Gamma Route at the top of pitch 2 or to keep going boldly but pleasantly in a direct line up the slab, veering left to the lower-off on KC's Banana Cake or right to that of Braveheart. | ||
| Braveheart | 5.9** | 27m |
| More pleasant slab climbing. | ||
| Start just right of the flake of Gamma Pitch 2. Climb direct past a bolt to its dike. Pull up the scoop as for Gamma, but pull out left below the belay onto a slab. Follow the bolted line direct to a good ledge with a lower-off. You can just get down on a 50m rope. | ||
| Keroyon | 5.7*** | 25m |
| An excellent route for the grade. Keroyon is the name of a cartoon frog. | ||
| Start a short way up the gully to the right of KC's Banana Cake. Pull steeply left onto the slab, smear up then step right and climb direct parallel to Gamma Route on marvellous holds to a lower-off. The distance between the second and third bolts is quite far, but the climbing is very easy. | ||
| Keroyon Right | 5.7* | 30m |
| Another good slab on excellent rock, but the stepped nature detracts from the quality. | ||
| Start further up the gully from Keroyon. Step delicately left onto the slab, then continue direct to good trees just below the top. Currently (2016), there is no anchor. | ||
The next route starts out to the left of the top corner of Gamma Pitch 3. To get there, either climb the continuation pitch from the top of Braveheart or climb Gamma Pitch 3 and step left to a belay/ab point below the finishing corner.
| NewGam Hang | 5.9* | 22m |
| Pleasant slabbing to a satisfying heave over the roof. It will probably never catch on because of the location. | ||
| From the belay move up and left to a huge tree (if you're not already belayed to it). Step up onto the slab and climb this on good holds to a short corner under a roof. Swing left out of the corner then use huge holds to pull over onto an easy slab. Finish easily in the wood under Gamma Pitch 4. Currently (2016), there is no anchor on the trees. | ||
The next three routes start from a bay up and left of Monban no Musume. To get there, either climb Monban no Musume or scramble up to the left of it (by the fixed rope).
| Maboroshi wo Ou Hito - Spirit Chaser | 5.11a** | 10m |
| A fierce problem up the short arete overlooking Monban no Musume. A must for anybody looking for a cheap nose job. | ||
| Pull onto the arete from the left and make a nose-grinding move round and right onto the front face. A tricky pull and a mantel lead to an easy finishing slab. Lower off. | ||
| Gomen ne, Ecchan - Sorry, Ecchan | 5.10b*** | 18m |
| The steep, narrow face left of Maboroshi wo Ou Hito features some big pulls on big holds - a soft touch! | ||
|
Start in a small recess up and left of Maboroshi wo Ou Hito. Pull steeply out of the recess, crux, then weave the easiest way up the face to an anchor via some holds that make you go "Oooh!" The anchor is set back slightly, so it is better to ab than lower off. | ||
| Whisky Cat | 5.10a*** | 30m |
| A scruffy but very enjoyable route up the slab on the left of the terrace. The top two thirds are excellent. | ||
| Start at a two-bolt belay under the lower slab. Climb through a bulge using flakes on the right. Follow the edge of the slab to a recess with a two-bolt belay (for descent purposes). Pull out left past this, then go direct to the steep final slab. Good moves up this lead to a lower-off. | ||
| A 60m rope will get you down in one, otherwise lower off or ab to the anchor next to the fourth bolt then ab again (the existence and quality of the tat and krab vary, so be prepared to leave something behind, if necessary). | ||
Gamma Face
The steep face above and right of Gamma Slab
Either climb a pitch up the slab or follow the path round to its left, then back right across the top of the slab (in which case be very careful not to kick anything down). The routes start on the short slab capped by a steep wall and bounded on the right by a corner.
| Step of Future | 5.11c*** | 25m |
| Perhaps that should be A Step into the Future. Whatever - a cracking face climb with buckets of exposure. The bolts have been renewed and repositioned, for the better, it has to be said. | ||
| Climb the lefthand line up the lower slab to the foot of the steep arete. Power up the arete on its right to an obvious traverse right. From the end of this, finish direct at a lower-off, or continue up the short slab to a tree. | ||
| Back to the Future | 5.12b* | 15m |
| A former top-rope problem to the right. Take a Friend 0.5. | ||
| Climb direct to join Step of Future at the end of the traverse. | ||
| Gamma Crack | 5.10a*** | 15m |
| A good steep crack pitch in a fine position, but the crack itself is sandy after rain. Take a set of Friends. | ||
| Climb the right edge of the lower slab and the broken corner to a terrace on the right - possible belay. Follow the crack on good holds and gear to a lower-off. | ||
| Super Gamma Crack | 5.10b* | 10m |
| A contrived crack pitch up the jenga right of Gamma Crack. Take a set of Friends. | ||
| Climb a finger crack to an overhang then pull right to a hand crack. Climb this, step left and follow another crack to a ledge and lower-off. | ||
Zoku Ojisan Iwa - Second Uncle Rock
A scruffy, rarely visited slab. But well worth a trip for obsessives.
Follow the Kimpu-san Highway past the cairn for Gamma Slab for 100 metres or so to where a stream runs down from the right and passes under a steel grid on the highway. If you're inventive, you will spot the makings of a path running upstream on the right of the stream. Follow this, steeply at first, for about 50 metres and keep your eyes peeled for the second chunk of rock on the right of the path. The main path leads on past Puchi Rock to Gamma Summit; the path under Zoku Ojisan Iwa continues through jungle rightwards to KC's Banana Cake.
The routes are described from left to right and share the same lower-off on a hollow flake - that, in May 2011, has no krab and could do with replacing. I would also recommend backing it up with slings on the tree just right.
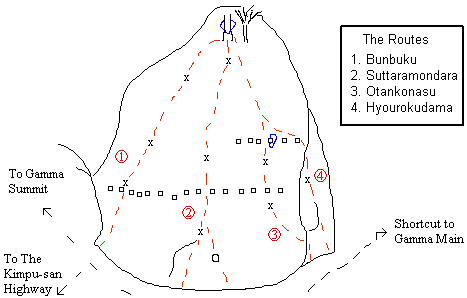 |
| Bunbuku - Joybringer | 5.10b** | 14m |
| The left edge of the slab. Sustained and a little scary. | ||
| Start left of the first bolt. Make a couple of scratchy moves to gain the dike, stretch right and clip, then make a desperate swing right and mantel onto it. Continue pleasantly to the lower-off. | ||
| Suttaramondara - Not Without a Struggle | 5.11a** | 14m |
| A choice of tricky starts followed by an easy slab. | ||
| Start in the centre of the slab, at the faintest of grooves. Use this and the good undercling that it becomes or the pocket to its right to smear slippily to the dike and mantel. Continue easily to the lower-off past a pocket and dike. | ||
| Otankonasu - The Dork | 5.10b* | 15m |
| The crusty slab further right with a steep start. | ||
| Gain the first dike from the right and mantel scarily onto it - a good move. Pull up to another dike (possible thread runner, but it's just above a bolt), then pad easily to the top. | ||
| Hyourokudama - The Nincompoop | 5.8* | 15m |
| Traverses in to the second dike of Otankonasu. Dirty, but enjoyable. | ||
| Start just up and right of Otankonasu. Pull up on jugs then use a big crumbly flake to pull left onto the slab. Swing left on jugs in the dike to join Otankonasu at the thread. Finish as for that route. | ||
Puchi Rock - Petit Rock
A small crag tucked just off the path up to Gamma Summit.
Continue up the path past the entry for Zoku Ojisan Iwa. After 50m (ish), a big, easy-angled slab is visible on the right. Cut in to the terrace above this slab.
| Unclaimed | 5.8* | 15m |
| The easy slab and face below Puchi Rock. Now (2018) very dirty. | ||
| Start on a disintegrating man-made terrace below the slab. Pull up to an overlap (crux) and pad directly to a ledge below the headwall. Pull steeply onto this, then go right and up to twin bolts below Mario Sisters (no tat). | ||
| Mario Sisters | 5.11b** | 19m |
| A swinging good time up the left edge of the crag. Better than it looks. Take a rack. | ||
| Start below a left-facing bottomless groove. Climb out to this, then go up it and left to a crack. Follow this till it ends, then climb diagonally right to a tree belay. | ||
| Chiisa na Shinsetsu, Ooki na Osewa - A Little Kindness Can Go Too Far | 5.10b** | 20m |
| Nice moves in a good situation, but the gear... Worth doing just to see the peg near the top - the worst piece of fixed gear I've ever seen. | ||
| Start just right of Mario Sisters, at a flake above a belay station (at the top of the unclaimed 5.8). Climb direct left of a tree to the first bolt. Pad slightly right and up to a dike. Mantel onto this (crux) then go up right of a slanting crack to a peg "in" a dike (don't worry, a long sling goes over the spike at the top of the crack, a big (#4) Friend holds it down and the top slab's a doddle). Climb diagonally left then go direct to a tree. Ab off. | ||
| It's Raining Holds | 5.10b* | 10m |
| The crack and face above and left of Puchi Rock (30m further up the main path). | ||
| Climb the crack past a tree stump then continue direct on crusty holds to a steeper section. Heave up on jugs, then swing right to a final crunchy smear to the lower-off. Crux at the top. | ||
Gamma Summit
This area doesn't appear to have a name, so we'll call it Gamma Summit for now. This is basically the big slab and capping tower across to the left of the upper pitches of Gamma Route. And there's some good stuff up here.
Approach as for Zoku Ojisan Iwa, but continue straight up the slope for another 5 minutes till you hit rock. There is actually more than one path, and where you hit rock depends on which branch you're on. At the left hand end is Magga Slab; in the centre is the impressive roof of Rebecca e no Kagi. To the right are the broken buttresses of Cassandra and Kappa (and eventually the path from the top of Gamma Route pitch 3). The routes are described from right to left.
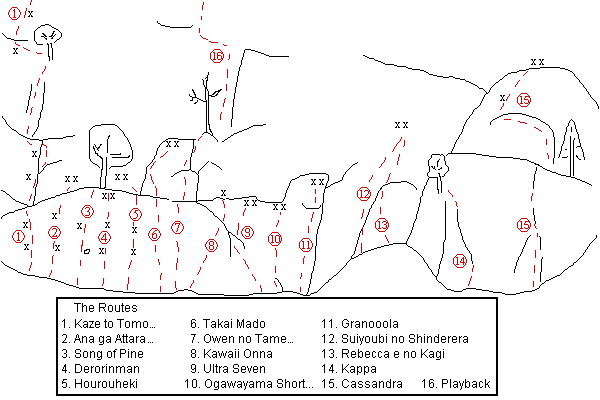 |
| Cassandra | 5.10d*** | 40m |
| A much underrated route. Perhaps people are put off by the appearance of the first pitch. Don't be - the second is a beaut. Take a rack. | ||
|
Pitch 1. 5.9 Climb a series of broken cracks and grooves up the centre of the first substantial face to belay on a sumptuous ledge below an arching thin crack. Pitch 2. 5.10d Pull into the thin crack by tricky, thin moves. Follow the crack up and left to a bolt. Pull over and trip tidily up the receding slab to belay. | ||
| To descend, ab the route. | ||
| Kappa | 5.8* | 18m |
| The flake crack round to the left of Cassandra and just right of a grotty corner. Rack up, ditch the tinies and go heavy on the bigs. | ||
| Follow the slightly slanting handcrack all the way to a tree on the left. Holds on the left keep the climbing pleasant rather than thrutchy. Ab off. The crack to the right is a crumbly 5.10a with an appalling anchor. | ||
| Rebecca e no Kagi - The Key to Rebecca | 5.12b** | 30m |
| A good steep line but the rock's less than perfect. There seems to be a lower-off on the lip - or is it just a back-up for a crap bolt? Perish the thought. | ||
| Start in the cave round to the left of Kappa. Follow the bolted line through the roof till the angle comes to its senses. Continue more easily to a lower-off. Check you've got enough rope to get down. | ||
| Suiyoubi no Cinderella - Wednesday Cinderella | 5.11a***** | 35m |
| A superb pitch. Take a Friend 2 for the start (but lots of people do it without). | ||
| Start just left of where the overhang gets serious, below and left of a groove. Climb any way you like to the first bolt. Go up, then right into a scoop, then make a steep and reachy pull (crux) to where the angle relents. Climb a short crack then move up and right to a lower-off. | ||
| It is possible to ab direct to the ground with a 50m rope. It is possible to lower off direct to the ground with a 60m rope. Either way, it's best if someone follows to get the gear. | ||
| Unrecorded | 5.10b** | 15m |
| A steep jug-puller which deserves a name. | ||
| Start just left of Suiyoubi no Cinderella, below an orange overhang. Climb direct to the overhang, heave over on big holds and continue steeply to a lower-off. | ||
To the left, the rock sticks out slightly, but at an easier angle. This has been christened Magga Slab, and the name appears to be sticking.
| Granooola | 5.10b | 20m |
| The crusty right edge of the slab, where it's almost a face in parts. Take the route name into account! | ||
| Slabby moves on crumbly jugs lead up to and over a bulge to a lower-off. That crunching sound is your footholds disintegrating. (Debolted in the public interest in summer, 2000 - though the lower-off and top bolt remain.) | ||
| Ogawayama Short Story | 5.9* | 15m |
| A poor route with no obvious line. | ||
| Tricky starting moves up a short, slabby rib behind a suffering tree lead to easier climbing, then one steepish move to a lower-off. | ||
| Ultra Seven | 5.7** | 15m |
| The obvious line of weaknesses left again is a touch more fun. | ||
| After a stiff starting pull, saunter up the slab on good holds to below a slanting bulge. Pull right over this then go left and up to a lower-off. | ||
| Kawaii Onna - Pretty Woman | 5.8*** | 18m |
| Very good! Start at a dike where the slab takes a step up. | ||
| Climb the dike and slab easily to the first bolt at about 8m. Move left using a thin break, stand up in it and go right to a left-leaning corner. Stretch right out of this to a good finger edge and use this to gain a jug further right. Cut loose, heave up and then climb easily to a terrace and single bolt in someone's shrubbery. Belay on the best tree you can find or step right to the lower-off of Ultra Seven. A 5.11a variation takes you direct from bolt one to bolt two. | ||
| Owen no Tame ni Inori wo - A Prayer for Owen Meany | 5.10c** | 20m |
| A neat and varied pitch, but a little lacking. | ||
| Start just left of Kawaii Onna. Climb straight up the slab on spaced bolts to below the crumbly right edge of an overhang. Make a weird move to get established on the lip, then a full-body smear up the runnel above to easy ground and a choice between a lower-off on the left and a tree over the back. | ||
| Takai Mado - High Window | 5.10b** | 21m |
| An easy slab leads to a steep, hard finish. | ||
| Climb the slab just left of Owen no Tame ni Inori wo till it ends at a short steep tower. A couple of exciting moves up this lead to a lower-off below the central terrace (or you could pull over to the right and do Playback). | ||
The section of slab to the left is short and finishes at an obvious terrace.
| Hourouheki - Wanderlust | 5.10b* | 8m |
| A short slab with little going on. | ||
| Follow the line of RCC bolts (well, there are 2, and most people climb about a metre right of them, which is where the holds are) to the right edge of the terrace. Lower off a disturbingly slender tree or look for something more substantial to the left. | ||
| Derorinman | 5.11d*** | 10m |
| Short, but very tiring on the fingers. | ||
|
Start a couple of metres up and left of Hourouheki. Climb to the second bolt by fingery pulls on sharp dots and blunt crimps. Easier moves lead to the terrace. It's standard | ||
| Song of Pine | 5.8* | 10m |
| The one-bolt wonder in the centre of the slab. | ||
| Follow the obvious line to the terrace - there are good holds where it matters. | ||
| Ana ga Attara, Detai - I Wish the Earth Would Spit Me Out | 5.10a** | 10m |
| The next line along - the holds stand out. | ||
| Make hard moves to get established on the slab, then climb directly and more easily to the terrace. Holds on Song of Pine are out of bounds. | ||
| Kaze to Tomo ni Sarinu - Gone with the Wind | 5.11b*** | 70m |
| An excellent 4-pitch route. Also well worth it if you do Koinuma-Yonekura Crack as pitch 4. Take Friends 1~3 for the double cracks on the first pitch. | ||
|
Pitch 1. 5.10d Start where the slab starts to blend left and up into the hillside. Climb the slab to an arete. Hard moves up this lead to a ramp on the right. Swing left to the base of twin cracks and climb these to belay at a tree on a good ledge. Pitch 2. 5.10a Step left, awkwardly surmount a small overhang, then climb the slab above to a good ledge and belay. You can continue up the next pitch if the drag's not too bad. Pitch 3. 5.9 Climb the very short slab behind the belay to a ledge below the final tower. There's an anchor on the right, but the big tree on the left is better situated for the top pitch. Pitch 4. 5.11b Climb the centre of the face to finish on the top of this particular part of the world. A superb pitch! If you ever see this from below, you'll want to do it. | ||
| Descend by abseiling 50m down the back left face to where the gully becomes walkable then stumble back down to the start of the route. You can split the ab at one of the route's belays if necessary. | ||
The following routes start about 30m up and left of Kaze to Tomo ni Sarinu in the vicinity of an attractive undercut slab:
| Unknown 1 | 5.10d** | 40m |
| An interesting diversion piecing together 3 prominent features: the slabby rib, the short blocky face and the attractive top slab. | ||
|
Pitch 1. 5.10b Start where the slab starts to blend left and up into the hillside. Climb the slab to an arete. Hard moves up this lead to a sloping ledge on the right. Swing left to the base of twin cracks and climb these to belay at a tree. Pitch 2. 5.10d Step up right to the slab. Sustained moves lead to a crux mantel just below the top. A good pitch despite some dirty rock. The top gives you great views. | ||
| It's possible to ab from the top of the route (2 ring bolts, tat but no krab), but better and safer to walk left (facing in) to a good tree with slings and krabs. 40m all the way down, so split the ab at a tree on the way down if necessary. | ||
| Unknown 2 | 5.8* | 10m |
| Crusty rock, but good clean fun up the disappearing crack. Take Friends #1 - 2½. | ||
| Pull up to the crack and climb it to its end. Reach right to a good pocket, then smear crunchily up and left to the tree on the ledge above. Lower off. | ||
| Unknown 3 | 5.11b* | 15m |
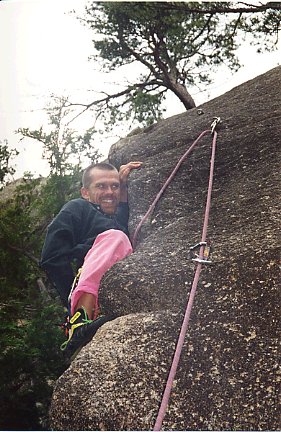
| The unsatisfying undercut left arete. Take a look at the pic to see what too much time in Japan has done to me! | ||
| Pull onto the arete using some grubby holds on the left. Make a couple of neat moves up, then either smear up sandpaper on the slab or swing right and heave up steep jugs to the ledge with the tree (I'm not sure which - I went for the jugs). Finish up the desperate short slab behind. Ab off a good tree - no lower-off. | ||
The following routes start at least one pitch up and are best gained by climbing a route below:
| Playback | 5.11a** | 20m |
| A good steep pitch up the face above Kawaii Onna. | ||
| Start on the big terrace at the top of Kawaii Onna. Climb a short corner, then a left-leading line up the vertical face above to the terrace below the summit tower. There appear to be a few more bolts up there now, but nothing has been reported. | ||
| Koinuma-Yonekura Crack | 5.7** | 15m |
| The big wide crack in a cracking position on the south face of the tower. Take big Friends and/or huge nuts. Fnarr. | ||
| Start at the top of pitch 3 of Kaze to Tomo ni Sarinu. Move left to the crack, swim to the top and say: "This is easier than it looks." Take your pick of lower-offs. | ||
| Sodom | 5.12a** | 13m |
| The short steep right face of the summit tower. The word is, this would be a lot more popular if it were a little more accessible. | ||
| Start in the centre of the face. Make a hard move to get started, then climb more easily to moves diagonally left past a pegged crack. Crux moves past a steep(er) section lead all too quickly to the top. The arete to the left is now bolted but unclaimed. | ||