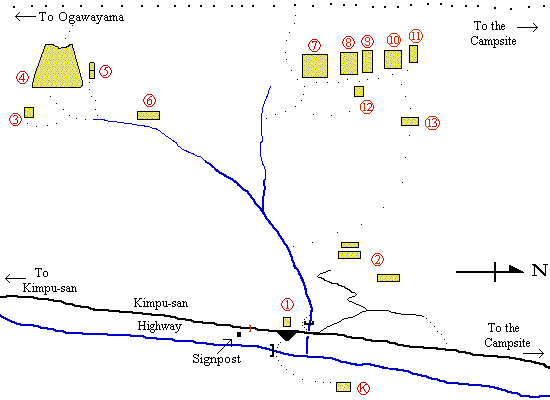
Karasawa is the second prominent stream the Kimpu San Highway crosses on its way up. The crags are spread along its left bank or the slopes to its north. The Karasawa rocks themselves are numbered starting from top left. They are huge, but broken and unpopular. I've also included the crags at the very top of stream, based around the huge Butsudan Iwa.
The photo below is taken from the top of Phoenix Iwa, looking north-east. Butsudan Iwa is away to the left.
Roll your mouse over the photo to see crag names. Click a name to jump to the crag description.
|
|

|
|
Phoenix Iwa - Phoenix Rock
This is the rock in the clearing about 2km up the Kimpu San Highway. Most of the routes have been rebolted, making this a decent spot to bring beginners. Apart from Phoenix and Kurama Tengu, none of the routes here has been reported. Routes are described from left to right, down to up.
To get there, follow the Kimpu San highway past the chain. After 2km-ish you cross Karasawa, though you might not notice - look for a dam on the right. About 50m after this the road opens out into a clearing with Phoenix Rock on the right. An old forestry track disappears into the jungle on the opposite bank of the river.
| Unknown | 5.12b* | 9m |
| The steep face left of Phoenix. The grade's a guess. | ||
| Climb the face on small holds with short-term help from a decent undercut flake, then head up and right to a lower-off. | ||
| Phoenix | 5.11b** | 9m |
| The steep crack on the left side of the crag. A long-standing top-rope problem, now bolted, kind of. | ||
| Pull up flaky holds right of the line of the crack, then make a desperate move left into it. Follow the crack on so-so finger jams to a lower-off back in the vertical. | ||
| New 1 | 5.8** | 11m |
| The slabby rib right of Phoenix, gained from the left. A decent route. | ||
| Swing out right from Phoenix to a steep pull onto the slab. Follow the snaky crack just right of the edge to a lower-off. The direct start is an insecure 5.9. | ||
| New 2 | 5.7* | 13m |
| The central groove. | ||
| Climb the groove with a detour round the huge dead tree. Step left to finish at the lower-off of Phoenix, or continue to the lower-off of New 3, or climb the continuation corner (New 6). | ||
| New 3 | 5.8* | 13m |
| The left edge of the slab right of the groove. | ||
| Climb the groove to pull out right onto the slab as soon as possible. Follow the bolts up then right to a lower-off on the ledge on the right. | ||
| New 4 | 5.7** | 13m |
| The line just left of the right rib. Very pleasant. | ||
| Gain the small ledge on the rib however you like, then step left and climb the slab to the lower-off of New 3. | ||
| New 5 | 5.7* | 14m |
| The right rib. | ||
| Gain the small ledge on the rib however you like and then follow the rib to the lower-off of New 3. | ||
| New 6 | 5.9*** | 10m |
| The top corner is excellent. | ||
| Gain the corner however you like and follow it to a lower-off just below the top. While you're there, pull over and check out the state of the anchors on top. | ||
| Kurama Tengu | 5.11b** | 15m |
| Tengu is a red-faced goblin with a long nose, Kurama Tengu is their king (also known as Soujoubou). A good steep finish to Phoenix. | ||
| Start from the top of Phoenix. Follow good holds leading right and up to a corner (New 6), then pull airily through the bulges on the right. The line just right is unreported. | ||
| Grot 1 | 5.10d* | 18m |
| The crack and face round to the right and at a slightly higher level has, like the vomit on the carpet after a memorable party, not been claimed. Take a lot of Friends. | ||
| Start below a cracked, tottering bulge in a corner. Pull up and move left round a bulge. A hard move over the next bulge gains a huge but crumbly jug and a bolt out left. Mantel to another crumbly jug (good Friend 2 ½ but iffy rock) and make a very precarious mantel on this to reach another bolt. A short sharp pull leads to an easy finishing slab and lower-off. | ||
Crag Z
This is a cluster of slabs and faces in the woods up and right of Phoenix and down and right of Karasawa 4 Kabu Slab. There are 3 obvious sections: The low-angled lower slab and the loose wall to its left; the middle section, with a triangular tip; and the upper section. A couple of routes were developed on the middle section back in the day of RCC bolts and then the area was neglected. In 2020, an access road was gouged out of the hillside, possibly to access the dams in Karasawa. The tree-felling for this opened the rocks up to extensive development.
No details have been released yet - the names and grades are all mine.
To get there, follow the Kimpu-san Highway past the chain almost to Phoenix. Just before Phoenix, you pass a big dam on the right (Karasawa). Just before this a wide track blocked by boulders cuts back then zig-zags up the hillside. For the bulk of the routes, follow this to its end. The first routes are visible up and right. For the lower section, break off from the track after the first bend and make your way to a low-angled slab.
The Lower Tier| Needle Slab | 5.7 | 20m |
| Climbs near the left edge of the lower slab. A poor route that needs to be bone dry. 2 bolts and not much else. | ||
| Scramble over stacked larch needles to reach the slab. Pull up to a bolt and smear to another. Continue over a slight bulge (sling a tree on the right if you fancy) to a lower-off. | ||
The Middle Tier
This is the only really worthwhile part.
| Bulgy Bits | 5.10b** | 15m |
| Climbs the left edge of the upper part of the slab. The start is much harder than the rest, but it remains interesting. 4 bolts. | ||
| Start at the left end of the ledge that runs part of the way across the slab. Pull steeply through the initial bulge to a rest below the second bolt. Continue more easily to the top and twin bolts (no lower-off). | ||
| Heave Ho! | 5.10b** | 15m |
| Rediscovered and rebolted. Badly. 3 bolts. | ||
|
Start a short way along the ledge (right of Bulgy Bits), below a stretch of dike that is a wonderjug. Clip a high bolt, reach for the jug, choose your spot and heave. From the dike, clip then make a long run-out to the third bolt (possible poor cams), then climb the slab right of the arete to a runnel and a lower-off. It's also possible to start up the one-bolt slab below the ledge. | ||
| Pyramid Scheme | 5.10c** | 15m |
| A lovely crack after a snappy, scary start. 2 bolts and a rack. | ||
| Start a short way further along the ledge (right of Heave Ho!). Clip a bolt, stretch right for a crumbly finger jug, then pull right and mantel. Step up, clip again, then climb to a break (gear). Step left to a lovely crack and follow this to the tip top of the slab and a lower-off. | ||
| The Great Cornholio | 5.10c*** | 25m |
| A great finish makes up for the non-descript start. 3 bolts and a couple of cams. | ||
| Start at the base of the slab, right of a large flake that turns into an arched overlap. Climb straight through the arch (possible cams) to a steeper section of slab. Pull onto this left of a runnel and stand on a jagged dike. A good technical sequence from here leads past a pocket to a lower-off. | ||
| Slab Happy | 5.8** | 16m |
| Pleasant, easy slab-climbing. If it's a hold, it's a jug. 3 bolts and a couple of cams. | ||
| Start at the base of the slab, by a uselessly low bolt. Thin moves past this lead past easy smearing to a steepening. Pull up (possible cam) and finish on jugs at a ledge with a tree and no anchor. | ||
The Upper Tier
This looks quite good at first glance, but... Basically, the rock is too poor to be enjoyable.
| Zaphod | 5.9 | 14m |
| Crunchy climbing pretty much all the way. 2 bolts and a couple of cams. | ||
| Pull up to a squarish overhang, dodge this on the right then step left under 2 bolts. At the second bolt, pull left to big holds leading to the top. Twin bolts with no lower-off. | ||
| Zebedee | 5.10b | 15m |
| More crunchy climbing. 2 bolts and a couple of cams. | ||
| Pull up to a short crack, then climb pretty much direct to the top. The crux is a longish reach from a suspicious 2-finger pocket by the second bolt. This one has a lower-off. | ||
| Zinedine | 5.10c* | 16m |
| More crunchy climbing. 3 bolts and a couple of cams. | ||
| Pull up steep crunchy flakes, then step left to a black slab. Climb direct from here to a short wide (and crunchy) crack at the top. Use the anchor of one of the adjacent routes. | ||
| Zulu | 5.11a | 17m |
| More crunchy climbing. 4 bolts and a couple of cams. | ||
| Pull up the undercut right edge of the slab, then meander left and right and left again to the top. Twin bolts with no lower-off. | ||
Kyuketsuki no Shiro - The Vampire's Castle
This is the slightly wooded rock tower on the opposite bank of the river, about 200m down from Phoenix - the Stannington Ruffs of Ogawayama. Rarely visited and rightly so.
To get there, follow the Kimpu San highway to Phoenix Rock. Cross the river to gain an old forestry track. Follow this back and down into the jungle, then cut up a slight stream to the rock. If all goes well, you'll get lost, give up and go somewhere else. Otherwise, you hit the rock at the toe of the right sidewall containing Mahou no Ranpu. Routes are described willy, as it were, nilly.
| Mahou no Ranpu - The Magic Lamp | 5.10c | 15m |
| A good direct line, but the crack is filled with choss. Take a rack. | ||
| Climb the steep crack past a peg low down to a ledge and groove. Climb this and finish slightly left. Ab off. | ||
| Frankenstein no Gyakushuu - The Return of Frankenstein | 5.10a | 18m |
| An odd line, linking disjointed cracks a long way round to the left of Mahou no Ranpu (traverse a thin path left from the start of Mahou no Ranpu). | ||
| Climb the lefthand of two cracks till it peters out. Go up and right to a fork in the righthand crack. Follow the righthand branch to a lower-off. | ||
| Majou no Houki - The Witch's Broomstick | 5.9 | 15m |
| The crumbly off-width crack above the terrace up and right of Mahou no Ranpu (when viewed from Phoenix Iwa, this is the back face - the huge wedged boulder right of Koumori Gaeshi is a good landmark). | ||
| Start from the terrace. Pull out left to the crack and follow it nastily to a lower-off. Yuk. | ||
| Blackjack | 5.11b | 15m |
| The line of weaknesses just right of Majou no Houki, and the only even vaguely appealing route on the rock. Take a couple of small Friends. | ||
| Start just right of Majou no Houki. Pull strenuously up to a flake and follow this leftwards to a pull right onto easier but dirtier ground. Continue to a grotty lower-off. | ||
| Kaibutsu-kun no Sora - Goblin's Sky | 5.11c | 17m |
| A strenuous but filthy pitch up the steep face right again. | ||
| Start just right of the starting terrace of Majou no Houki. Balancy moves lead up and right to a dodgy bolt. Climb direct to an overhang, pull through and finish slightly left (crux) at a terminal lower-off just below the top. | ||
| Koumori Gaeshi - The Bats are Back | 5.10b | 20m |
| Filthy moves up the very disjointed cracks round and right. | ||
| Start 10m round and right of the starting terrace of Majou no Houki, about 5m left of the wedged boulder. Climb up to a dogleg crack and follow this to a terrace. Traverse left to a second crack and follow this rather dirtily to a tree at the top. Ab off. | ||
Karasawa Upper Crags
Immediately after the dam just before Phoenix Iwa, follow a path into the woods. This skirts the dam on its left and then winds up the stream bed. This is well marked with cairns, but cairns are cairns and this is a stream bed. After about 500m from the Highway, you should hit a fork in the path with a signpost (yes, really!) Take the right fork (left is the old approach to Penguin Iwa/Butsudan Iwa) and continue up the stream a short way then into the woods on the right. This marks the start of a good path up the hillside. Follow this through rhododendrons then along a very narrow stream. This path eventually breaks left out of the woods into a wider stream bed at the point where you hit Karasawa Ippou.
Karasawa Yonhou, Kabu Slab - Karasawa Four, Lower Slab
The squat slab below Karasawa Yonhou is bigger than you think and has three good, hard slab routes.
Just before the point where the path in the stream bed path jinks left, a faint path breaks out right and up into the woods. This is very hard to spot and harder to follow. Anyway, head up the woods past isolated jumbled low crags on the right to the first crag of substance. It's probably worth pulling out onto one of these crags occasionally to get your bearings. The slab is probably easier to find by trundling down from the upper crags, but that involves a lot of extra walking.
| Waiter | 5.11b** | 13m |
| A good but short slab pitch up the subsidiary slab. | ||
| Start down and left of the main slab. Fingery moves lead out left and up to a good small hold. Easier moves lead to a tree. Lower off, or scramble off to the right. | ||
| Elite | 5.11b** | 35m |
| A good pitch up the left side of the main slab. If it weren't for the crux, this would be a superb 5.9. Take a rack. | ||
| Start up and right of Waiter. Traverse out left to a disappearing crack. Climb this past a couple of bolts, then make scary, scratchy moves where it fades to gain its continuation. Follow this up and right past trees to its end. Ab off a cluster of shrubs or scramble off and down left of the crag. | ||
| Psycho | 5.11c* | 35m |
| Hard moves breaking out left from Elite. | ||
| Follow Elite to the continuation crack. Pull out left and follow the bolted line up the steep slab to the top. Ab/scramble off. | ||
Karasawa Ippou - Karasawa One
A big, squat crag, with a variety of rock and routes.
Follow the path up behind the dam to the signpost. Continue up into the woods and on up through rhododendrons and along a narrow stream. Where the path breaks left out of the woods, cairns mark another path breaking off right below a couple of tall crags. Follow this across and up to a broad face with a baby pinnacle at its base. There is an unclaimed bolt line on the steep face behind the pinnacle. 10m right is the tufted crack of Uragirimono Crack.
Allow 1 hour + recovery time for the approach.
| Uragirimono Crack - Traitor's Crack | 5.10b* | 40m |
| A good line, but now too vegetated to be enjoyable. Take a rack. | ||
| Climb the lefthand crack to a break. Follow this right to another crack and finish up this. | ||
| Nagare Boshi - Shooting Star | 5.12b**** | 20m |
| A great line that gets an extra star for exposure - it starts out there and goes further. Take a rack. Gain the start by easy climbing up the slab and corner below then a short traverse right. In October 2016, there is a fixed line all the way to ground level. | ||
|
Traverse out (rope recommended) to a hanging belay at the base of the crack. Pull into the gently overhanging crack and follow it all the way, past an absolute pig of a move to get from finger to hand, to a bolt belay. Ab/lower off. | ||
| The Knife | 5.10b** | 40m |
| Pitch 2 has an excellent crack, but pitch 1 has some duff gear and no real line. Take a rack. | ||
|
Pitch 1. 5.10b Start 10m right of the corner below Nagare Boshi. Climb up to a flake, then move left to a shallow crack. Follow this past a steep section (crux) to ledges and a bolt belay. Pitch 2. 5.10a Climb up to the base of the impressive crack and follow it till it peters out. Move right to a ledge then climb direct over easy ground to belay. | ||
| Descend by abbing the route or climbing off leftwards to the top, then scrambling down the gully between Ippou and Nihou. | ||
Karasawa Ippou Nanseimen - Karasawa One, Southwest Face
From the baby pinnacle, head up and left into the scree and look back right at Ippou. You should see a face high and left with a prominent flake (Chocolate Parfait) near its right edge. Scramble up the scree then cut right to this face.
| Wings | 5.10a** | 20m |
| A good climb that deserves more traffic. Take a rack. | ||
| Climb the crack all the way to its end. Go right then left over easier-angled ground to the top. Ab off. | ||
| Chocolate Parfait | 5.10b* | 20m |
| Good, but rarely climbed. The top flake would be great for beginners if you didn't have to struggle to the overlap. Take a rack. | ||
| Start just right of the obvious crack of Wings. Climb up to the right end of the big overlap. Udge right into a recess, then reach right to gain the base of a good flake. Follow this pleasantly to the top. Ab off. | ||
Karasawa Nihou - Karasawa Two
A tall, slender buttress with a couple of routes.
Approach as for Karasawa Ippou, then follow a vaguer path across right under Ippou and Nihou to the narrow gully between Nihou and Sanpou. The base of this gully is not a good place to be if anyone is descending it.
| Karasawa Nihou Original Route | 5.8* | 120m |
| A pleasant enough, isolated route, but the climbing itself isn't up to much. Take a rack. Pitches 1 and 2 can easily be run together. | ||
|
Pitch 1. 5.8 Pull up on flakes, then swing round left below the slab to a flake/ramp leading left. Follow this to a good flake on the right, then pull right onto the slab. Cross the slab diagonally right to a tree-filled crack. Up this to a good small ledge and bolt belay. Pitch 2. 5.7 Climb the righthand of the two cracks above the belay to a step left to a big ledge. Pitch 3. 5.7 Climb easily up to a wall. Pull up and dodge right to easy ground. Up this carefully to a ledge on the left. Pitch 4. 5.8 Climb easy slabs to a wall, then go up and right to the base of a corner. Climb this awkwardly to the top. Belay on a huge bollard. | ||
| Descend by abbing 25m, from a tree tucked down and right of the finish, to the gully between Nihou and Sanpou. Follow the gully all the way down, passing two rock steps that need to be abbed. | ||
| Karasawa Nihou Direct Route | 5.10a*** | 120m |
| Much better than the Original. Take a rack. | ||
|
Pitch 1. 5.10a Pull up on flakes to the base of the slab. Climb the centre of the slab past a bolt to a good small ledge and bolt belay. Pitch 2. 5.8 Climb the lefthand of the two cracks above the belay to a big ledge. Pitch 3. 5.9 Struggle up the short wide crack to easy ground. Continue easily to a good ledge. The thinner undercut crack to the left is Senbiki Crack (Ruler Crack), 5.10a. Pitch 4. 5.10a An excellent pitch. Scramble up to and climb the impressive crack in the left of the headwall. Belay on a huge bollard over the back. | ||
| Descend as for the Original Route. | ||
Karasawa Sanpou - Karasawa Three
This is the big face just across the gully right of Karasawa Nihou. Not really worth the walk, but at least you'll have it to yourself!
There is an unclaimed bolt line on the left edge of the front (east) face. There are two "classic" routes up the centre of this face. From the route names (Big Corner Route and Couloir Route), they should be obvious, but I couldn't work them out. Descent is by scrambling over the top to the top of the gully between Karasawa Two and Three. There is an ab point on a big tree (and 2 short abs as for Karasawa Two, once you are in the gully).Karasawa Sanpou, Tokeidai no Ganryou - Karasawa Three, Clocktower Ridge
The triangular slab under Karasawa Sanpou. Worth a visit, especially if you want to get away from the crowds. The main slab is excellent, but the bolts are few and crap.
As for Karasawa Ippou, but about 200m after you leave the main stream bed, a cairn marks a path cutting right into the woods (look for a band of tape round a tree, still there in 2016). Follow this across and then up to the slab - there's no path, but it's so close you can't miss it.
| Hachigatsu Route - August Route | 5.10a* | 45m |
| A nice start up the slab, but the route gives up after the first pitch. A set of Friends should do you. | ||
|
Pitch 1. 5.10a Start near the left edge of the slab, behind a big conifer and under a prominent tree on a ledge at 20m. Climb direct to the tree, crux between the bolts. Pitch 2. 5.6 Climb easily up and right to broken ground. Continue easily up and left to belay below a prominent short crack. Pitch 3. 5.7 Climb the crack, then traverse right and climb an easy off-width (apparently there is such a thing). Belay below the summit tower. | ||
| If you're careful, you can descend by abbing the route. Otherwise, scramble off left of the summit tower and trundle down the slope left of the slab. | ||
| Tropical Direct | 5.10a* | 20m |
| A good enough slab climb that would be better with real bolts, a brush-up and a bit more traffic. | ||
| Start right of centre of the slab, under a prominent overlap low down. Climb through the overlap at a bolt and continue in the same line to the big ledge on September Route. Keep going, again in the same line to a lower-off. Scary. | ||
| Meehaa Traverse | 5.10c* | 25m |
| Another good, neglected climb with crap bolts. | ||
| Climb Tropical Direct to its second bolt, then traverse neatly left past one thin move to Hachigatsu Route. Follow this to the stance at the top of Pitch 1. Ab off. | ||
| Kugatsu Route - September Route | 5.10a | 120m |
| A devious counter to Hachigatsu Route. Take a rack, and be sure to have some bigs. Looking at the crag with the topo at hand, I couldn't work the first two pitches out. | ||
|
Pitch 1. 5.7 Start up and right of the main slab, at a fault leading left into Tropical Direct. Follow the fault and continue in the same line to a bolt belay on a good ledge. Pitch 2. 5.8 Take care with rope drag on this pitch. Climb the slab behind the belay to a crack. Up this to broken ground, then traverse a long way left, under the stance at the top of pitch 2 of Hachigatsu Route to belay below an ominous off-width. Pitch 3. 5.10a Climb the crack then move right to finish up Hachigatsu Route. | ||
| Descend as for Hachigatsu Route. | ||
| Kogara - Willow Tit | 5.9* | 15m |
| A worthwhile climb up the juggy crack right again. Take a rack with at least one big Friend. Gear is good but can be hard to place. | ||
| Start just in from the right arete under a white bulge. Pull up on jugs to a crack slanting left - good Friends. Follow this to a vertical crack - slings on spikes on the left - and finish up this at a spiky bush. Belay on trees over the back and ab off down the gully on the right. | ||
Karasawa Yonhou - Karasawa Four
The big face just across the gully right of Karasawa Sanpou. Again, not really worth the walk, but you'll have it to yourself, and there are some great views.
Walk along the base of Karasawa Three to the gully between Karasawa Three and Four. Drop down the gully about 30m then continue along the base of the rock (there is a faint path). The most obvious feature is the amazing old bolt ladder that runs the full 60m height of the face. Just right of this is shared flake/chimney line of Fairway and Fuusetu Ranbu (Snowstorm Reel). These start by climbing over juggy, crumbly brown rock just left of a recess to belay on ledges. Fairway (5.10a) then climbs a crack to reach the long (now vegetated) flake right of the bolt ladder. Fuusetu Ranbu (5.8) climbs the hidden chimney on the right. The routes then merge and climb easy cracks to the top. Descent is by scrambling right (north) to the slope leading to the base of the routes.Butsudan Iwa - Altar Rock
The huge buttress at the top of the ridge turns out to be a cluster of big and small rocks on closer inspection. There are many old and new routes up here, but not much definitive information.
Butsudan Iwa is the biggest and topmost of these rocks. Penguin Iwa is a prominent pinnacle (its "beak" is obvious from most angles) to the right. Playland 84 is the lowest and leftmost of the group.
There are two approaches. The original follows the approach for the Karasawa rocks to the fork in the path with the signpost, then takes the left fork and continues up the gully. The path splits again: take the left fork for Electric Ladyland or the right fork for Penguin Iwa/Butsudan Iwa. The path is still usable, but it is neither pleasant nor safe. It is better to follow either the Shin Ogawayama or Kamoshika hiking course to where they meet, continue for 30 minutes towards Ogawayama (the mountain itself) then, at a slight peak in the path, follow a narrow hacked path (2015, marked with pink tape) left through bush out on to flat boulders at the top of the rock. The ab point at the top of the rock is located at the left end of these boulders, overlooking Penguin Iwa. Note the ab lengths!
Descend by abbing first to a tree level with the top of pitch 2 (25m), then to the stance at the top of pitch 1 (50m - you have to ab out right (facing out) otherwise you'll end up in the wrong post code for the route), then to the ground (40m).
| Electric Ladyland | 5.9*** | 115m |
| An excellent big day out taking a line of cracks and corners up the right side of the main buttress. Take a rack, and be sure to have some bigs. | ||
|
Pitch 1. 5.9 (40m) INCOMPLETE. Pitch 2. 5.9 (50m) INCOMPLETE. Pitch 3. 5.5 (10m) Climb easily to the next big terrace below a prominent crack. Pitch 4. 5.9 (15m) Climb the awkward crack with a step right to finish at the ab point on the summit. | ||
| Unknown | 5.9** | 60m |
| An adventurous jink up the right side of the face. Take a rack up to Friend 4. | ||
|
Pitch 1. 5.8 (25m) Scramble up the slope to rock then move right into a peg-filled corner with a helpful thin crack on its left wall. Climb the corner to a small ledge with a good tree and nut belays. Pitch 2. 5.8 (20m) Climb the chossy groove behind the belay to step up onto a short slab. Climb this and pull steeply into a handcrack. Jam this for a few metres, then, when the rock starts to disintegrate, step left and move up to a wooded terrace. Belay on a monster tree below the final crack of Electric Ladyland. Pitch 3. 5.9 (15m) Climb the crack with a step right to finish at the ab point on the summit. | ||
Penguin Iwa - Penguin Rock
This is the pinnacle to the right of Butsudan Iwa. Viewed from several angles, you can see where it got its name.
Approach as for Butsudan Iwa, but: If approaching from below, break out right up the gully, then scramble over low-angled slabs to the base of the pinnacle; if approaching from above by ab, take the "wrong" ab described for Butsudan Iwa, then scramble or ab down the gully to the base of the pinnacle; if approaching from above on foot, scramble down through bush to the gully on the north side of the pinnacle, then scramble (very carefully) down this to the base of the pinnacle.
| Penguin Crack | 5.10a**** | 40m |
| The obvious handcrack in the front of the pinnacle (in other words, the long southeast face). Take a rack up to Friend 4. The anchors at the top of Pitches 2 and 3 were renewed (real bolts!) in 2015. | ||
|
Pitch 1. 5.8 (15m) Climb slabby but crunchy rock left of the line of the crack to a ledge and old bolt belay. Probably better to continue up Pitch 2. Pitch 2. 5.10a (12m) Step right and climb the crack to a bolt belay on a small ledge. Pitch 3. 5.10a (13m) Step right again and climb the crack to finish at a bolt belay on the "beak" a few metres down from the summit. | ||
| To descend, ab left (facing in) for 25m to the gully left of the pinnacle and scramble to the start. If you want to top out, drop down from the final anchor (stay roped up!) to the right end of a ledge and follow the ledge left into the gully. You will pass under the start of Penguin Jam. | ||
| Penguin Jam | 5.9** | 16m |
| A not-as-thrutchy-as-it-looks little number up the clean, bulging hand/fist crack. Take a rack with at least one big cam. | ||
| Climb the crack to its end then pull onto easy slabs and sprint to the top. The ab/belay point is a sling round a dead tree and crunchy boulder and a ring bolt to its left. No, really. Be prepared to rig something up. | ||
| LS E Youkoso - Welcome to LS | 5.10a/b* | 50m |
| An intimidating climb linking a couple of cracks on the north face of the pinnacle. Take a rack with at least two big cams - the top crack is 20cm wide. | ||
|
Pitch 1. 5.10a/b (20m) Climb the easy initial bolted face till it is possible to go left to some trees guarding the first crack. Climb this, steep and hard at first, as it snakes right to bushes below a wide crack. Pitch 2. 5.10a (30m) Climb carefully over a loose block to enter the crack, then thrutch offensively till it narrows and finishes at a two-bolt anchor. Depending on your wealth/bravery/stupidity, you may find yourself shunting your big cams up the crack. | ||
| To descend, the first ascensionists recommend a 60m ab down the route. They say you can't get down with a single rope, which I don't understand, but there you go. | ||